CallerTips
| Description | CallerTips: free, practical advice for new and aspiring square dance callers - your first singing call, resolving the square, stations, the Taminations sequencer, equipment, progressive squares and more. |
| Author(s) | Vance Morrison |
| Repository | https://github.com/vancem/CallerTips |
| Copyright | Copyright © 2024-2026 Vance Morrison. Licensed under CC BY 4.0. |
Caller Tips I Wish I Had Been Given
By Vance Morrison 4/2024
Licensed under CC BY 4.0. You may share and adapt this book for any purpose, provided you give credit.
Target Audience
This document is for people who are just starting out (or just thinking about) square dance calling. You may have taken a short ‘course’ on calling, or maybe you have been mentored by a more experienced caller, or maybe you are just thinking about being a square dance caller.
There are plenty of square dance callers who are more experienced than I (I have only been calling for several years), or have been teaching calling (I have never done that), but I have one advantage over all of them: I still remember the things I had to learn ‘the hard way’. I also have learned relatively recently, so I learned AFTER things like Taminations, SqView, music for callers, or the callerlab teaching site existed, and thus have a ‘new caller’ perspective on how to use them to best effect. This document is NOT meant to be exhaustive, but hopefully you will find nuggets of information that you find useful.
This document got longer than I expected when I started. Please don’t be intimidated by its length. It is longer partially because I wanted to SLOW DOWN and really try to explain things in a comprehensible way. Don’t feel like you have to read it end-to-end. Think of it as a menu from which you can pick and choose and only read what catches your interest.
To determine what to read, the table of contents is helpful. Clicking on a section in the table of contents brings up a link that will take you to that topic, so you can skip around with ease.
Chapters
- When You Are Just Thinking About Calling
- The Progression to Becoming a Caller
- Your First Singing Call
- Equipment and Software You will Need
- The Taminations Sequencer Is INDISPENSABLE
- Learning to Resolve a Square
- Rules for Good Patter
- CallerBuddy For Playing Music
- No Experience Necessary Dances
- Advanced Things
To read or print the whole book as a single page, use the printable version.
When You Are Just Thinking About Calling
If you are just thinking about calling, you don’t need to pick up a microphone to discover SOME of what it is like to be a caller. The basic idea is to watch CAREFULLY what is happening as someone else calls and notice some properties of the square. Most dancers know the concept of the ‘mirror’ that states that you and the person who is the same gender in the opposite couple will always be ‘mirror images’ of each other in the square. This is SUPER helpful for calling because the caller only has to remember HALF the square (since the other half will be determined by the mirror property). But there are more properties of squares that are useful to calling that you can observe when you are dancing.
Even and Odd Stations
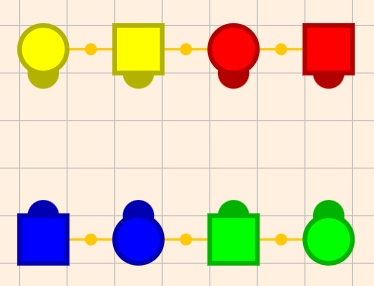
Most dancers have noticed that when the squares are in facing lines as normal couples, sometimes everyone is ‘coupled up’ and other times only one couple is together and the other couple is ‘swapped’ with their opposite.
| Even Station (all coupled up) | Odd Station (2 coupled up) |
|---|---|
 |
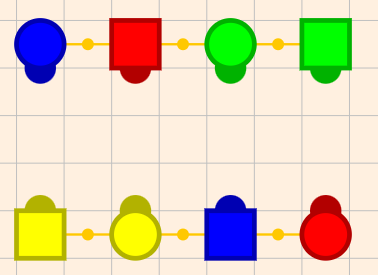 |
Squares where everyone is coupled up I will call even station and squares where only one couple is together I will call odd station. What is interesting is that
- These are the ONLY two possibilities (assuming the couples are normal and at least one of the couples is paired up, and you don’t care about order of couples).
- This concept of a station can be defined so you can determine what station a square is in from ANY formation (not just lines). Thus it is something you can ‘track’ in real time as you dance no matter what formation the dancers are in.
- There are VERY FEW calls that will move back and forth between even and odd stations. Thus it is easy to WATCH for when these transitions happen.
- The technique for resolving a square is quite different for even and odd stations. Thus you can often easily ‘spot’ when the caller is trying to resolve the square, and you can make an accurate guess on what the next call will be.
We will discuss the concept of stations in depth in the joy of stations section. The point I want to make now is that there are interesting things you can do as a dancer that will increase your appreciation for square dance choreography, and this knowledge will be helpful if you ever decide to be a caller. So if you just want to appreciate the hidden patterns of square dance choreography, feel free to skip to the joy of stations section and watch for station changes as a dancer.
Memory practice (who’s your corner?)
There is no getting out of the fact that a caller has to remember AT LEAST three people to resolve a mixed up square. This is a COUPLE, and the corner for that couple (typically it is the man’s corner, but it could just as easily be the lady’s corner). This information, along with the even-odd station of the square will allow the caller to resolve ANY square. Remembering the couple is often easy (you know particular people dance together, or a couple wears matching clothing), however remembering the corner is MUCH harder because it is arbitrary and likely changes every tip.
You know remembering corners is HARD because even experienced callers make this mistake routinely. The problem is that human memory is DESIGNED TO FORGET THINGS after about 10 seconds (most things are not worth remembering longer than that). Only things that are IMPORTANT get remembered longer than that, and for your brain only things that are RECALLED are considered IMPORTANT. Thus to remember something you have to recall it while you still can remember it. If you REPEAT this, recalling the information again and again, and each time you recall it, you are likely to remember it longer. Each time you recall, you can wait LONGER before you have to recall it again (in fact it works better that way).
For example, imagine you are at a party and you are meeting new people. If you want to remember the name of someone you just met, you should first NOTE the name when you first hear it (making it important). It also is helpful to USE the recalled name and ASSOCIATE it with things you already know (e.g. recall other people with that name, or words that the name sounds like, or words that rhyme with it, ANY associations are helpful). Then after 5-10 seconds you should just bring to mind this person’s name (while you can still remember it). Then 10-20 seconds later again recall this person’s name. Do it again after 3 minutes, and again in 10 mins, and again an hour later. If you do this you ARE likely to remember that person’s name.
The important point is that remembering is about DISCIPLINE. IF you are DISCIPLINED and RECALL a particular fact several times over the interval when you still remember it, then you WILL promote the memory into longer term storage and remember it longer, and if you do this enough and over large enough periods of time, you WILL remember that new fact forever.
The big problem is that it is easy to ‘forget to recall’. You get distracted and forget to RECALL the fact you just learned. If you get distracted long enough, you will let the new piece of information slip out of your recall window. This is definitely a problem but it is also solvable. If the information is important enough, you COULD set an alarm on your phone so you will not ‘forget-to-recall’. If you go to the trouble of resetting the alarm each time you recall, then you are certain to force enough recalls to implant the memory. Notice that ANYONE who is sufficiently disciplined, can remember a fact that is IMPORTANT enough to go to the effort of setting alarms on their phone.
The good news is that in square dancing the problem is easier and we don’t need to go to the trouble of setting phone alarms. First, you typically only have to remember one fact (your focus couple’s corner), AND you only have to remember it for a limited time (a full tip, which is less than 20 min). Moreover, calls themselves (or full figures that bring the square home), act as TIMEKEEPERS. This suggests the following procedure
1) Note the corner when you start the tip (recall several details about the person and the corner (e.g. color of clothes, hair color, or anything distinctive).
2) After about 3 or 4 calls (< 10 sec), FIND your couple and corner in the formation (thus forcing a RECALL)
3) WHENEVER the square is about to be resolved, AGAIN NOTE your couple and corner. (this probably happens every 30 seconds or so).
IF you do this, you WILL remember your couple and corner. Again it is about DISCIPLINE. Also note that you don’t need to be the caller to do this, you can do this as a dancer. Simply note who your corner and partner are. Then every several calls, look where your corner and your partner are (which forces you to remember who that is). It is OK (in fact better) if you think about other things between these recall attempts. Once you reliably always check on your corner and partner (and thus remember who they are) you can make it a bit harder by noting where the corner’s partner is as well (thus remembering three people (along with yourself). You may think this is easy, but the trick is to do it RELIABLY. Promise yourself that you will do this on every tip of a dance (just like the caller), and see if you can get 100% accuracy throughout the dance (this is what the caller has to do).
Finally if you succeed in all of this, instead of using yourself as your focus person/couple (which is easier), try doing it where you remember your OPPOSITE couple and their corner. This is harder, but more like what a caller has to do. If you can do this you have mastered what is perhaps the hardest part of what a caller does when resolving a square (and all it took was getting into the HABIT of RECALLING a small fact (your corner) at intervals).
The Progression to Becoming a Caller
When a non-caller thinks about what it takes to be a square dance caller, they usually think of ‘resolution’ (the ability to bring all the dancers back to their home position), and it is certainly true that resolution is an important part of square dance calling, but it turns out it is not the thing you learn first, nor the most important thing. A typical progression is
- Get over the nerves that you have using a microphone in front of other people and making very public mistakes.
- Learning and performing a singing call. Working on singing. Your singing call will have a memorized (or read) figure. Getting smooth with that.
- Learning a few modules (calls that are used together as a group)
- Learning how to deal with sound, music, applications like CallerBuddy, SqView etc. In other words learning the nuts and bolts of performing on your own (rather than just a guest caller with others’ equipment and music).
- Learning how to resolve.
- Learning about flow, hand issues and other subtleties associated with choreography
Thus my advice to beginner callers is to concentrate on the first three (or 4) skills. In particular just learning a singing call and doing it well, is a great (and useful) start.
Your First Singing Call
To help you out I would suggest the following song for your first Singing call:
This song is one of the best to start with because
- It is EASY TO SING. You are talking to music, so even people who are not very musical can typically do this well (it is more about attitude than anything else).
- It is EASY for the dancers. The music is slow enough that dancers can keep up easily, and the lyrics are sparse, so the calls are easy to find between the lyrics.
- The promenade part of each figure is EASY to find (it has backup vocals in it), which means if you mess up and need to ‘resync’ it is easy to find that spot.
- The middle break and closer sections are the same music as the figure sections. Thus if you accidentally confused whether you are on a figure or on a break/closer, you can recover.
- It is a CLASSIC song that most callers will have, and dancers will be familiar with it.
- The cue sheet that comes with it is GOOD (so you can use it unmodified),
- It is cheap. You can literally buy the song for $6, by following the link above. This is about as cheap as they get.
So if you have never called, just go to Rhythm records Boogie Shoes entry, play the ‘Vocal’ button that will play the song with Wade Driver singing, and sing along with him (On the web site it will only play ½ the song unless you buy the song, but you can get the idea). The ‘Sheet’ button will give you the words (Note that the lyrics use ‘Turn thru’, which has been taken off the mainstream list, you should say ‘Turn your partner by the right’ instead). Memorize the words. Do not rely on reading the lyrics during the performance! You want to perform the song WELL, and that means PRACTICE and by the time you have practiced the song enough you will have memorized it anyway.
TIP : Many people may be scared away from calling because they don’t think they sing well enough. Do not let fears about singing stop you. There are PLENTY of songs that are like Boogie Shoes that are ‘talking to music’. If you can talk, you can ‘sing’ these songs. Sure it would be better to sing well, but that happens through PRACTICE, and these ‘talking’ style songs will get you going. If you don’t know which songs to start with you can look over my favorites on the Singer page, to find some candidates. ‘King of the road’, and ‘Witch Doctor’ are other songs that are more talking than singing. Once you have a song title, you can go to the web sites in the buying music section to actually purchase them.
TIP : There is a difference between having learned something well enough to do it, and learning it well enough so you can’t fail to do it well. When you are performing you will be NERVOUS and DISTRACTED (squares will break, or something else happening on the floor will distract you). Thus if you CAN do it wrong you WILL do it wrong. You need to practice your song enough so that you will sing it properly even if your attention is somewhere else. (I find singing in the shower works well. After a week of that, I have learned the song well). Practice, practice, practice, singing is fun, do it all the time!
TIP : When starting out, it is better to learn one singing call REALLY WELL than to know several singing calls imperfectly. This is because at the start you are likely to only have ‘guest tips’ where you will only be asked to do one tip. You want to make that ‘good first impression’ and you do that by having a ‘winning’ singing call. Thus while I recommended Boogie Shoes it is MORE IMPORTANT that you find a song that you really like (and will happily sing day in and day out) and practice that song. Practice it END TO END in the shower and any other place, and use the same figure (initially, later on you can expand). This keeps it SIMPLE and as FOOLPROOF as possible. Now you have the song you will sing when you need the performance to absolutely go well. You are set for all your guest calling tips. Later you can add to this (first by adding a few new singing calls, and later by adding multiple figures to each singing call).
TIP : Do not perform a new singing call until you have practiced it on at least 3-5 SEPARATE days PERFECTLY and at least a day or two have passed since you have finished your 3rd perfect session. The reason for this is that you need REPETITION and SLEEP BETWEEN REPETITIONS for your brain to really consolidate the memory in a way that is FOOLPROOF. It is VERY TEMPTING to get a new song and want to perform it IMMEDIATELY. This is a bad idea. If you are a beginner it is a VERY BAD IDEA. I have been burned by this more than once before I learned my lesson. Learn from my mistakes. Just perform a song you already know well, and perform the new song next time, after enough practice.
TIP : Even if you make a HUGE MISTAKE during your singing call performance, it is better NOT to restart from the beginning. The reason is that dancers want to dance, and they WANT to see you succeed. Dancers are USED to repairing squares (they have to do it because of dancer mistakes all the time), and thus repairing and continuing gets them dancing again FASTER and allows them to preserve the illusion that the dance did not go badly. So if your singing call completely crashes do the following
- Tell the dancers to get to a SQUARED SET (they do not need to go home, but the boys will tend to always go home, the girls may or may not (it does not matter)). The music is still going.
- Your goal is to start them up again on the next figure, or middle break or closer. Thus you have to wait for that point in the music. This is where having a singing call with a solid ‘Refrain on the promenade’ helps. You can have them simply wait, but you can also ‘kill time’ by having them do the following.
- All 8 to the middle with a cowboy hell (kills a little time)
- Circle left, you can wait up to 16 beats before you call ‘allemande left and promenade’. A great time to stop the circle left is when the refrain starts.
- Allemande left, turn partner by the right, Allemande left kills a bit more time.
- If your ‘killing time’ calls in step 2 goes long, don’t sweat it! Just do a circle-left, allemande-left, dosado, allemande-left, swing and promenade figure. This figure is very robust and magical because it can use more or less time based on when you stop the circle left. Thus it tends to use up the right amount of time (all you need to do is do the allemande left at the correct time).
- If all else fails, just patter call your figure independently of the music and repeat as necessary. The key is to simply give them something to do until the song ends.
- If you get home too early (e.g. you forgot a closer or one whole figure), Don’t sweat it, when they are ‘home’ just have them bow to the partner and corner, and while they are doing that turn off the music.
-
If the music runs out just get them home as quickly as you can without music and ask them to bow to their partner and corner and thank their square.
When the singing call breaks REALLY BADLY, your singing call becomes a patter call with swings. Forget about singing lyrics. If there are points where you are not calling and you know the words for the current point in the music go ahead and sing, but fade out whenever you need to call, and don’t worry about it. The goal is to KEEP THEM DANCING.
In short, don’t stop a singing call, but salvage as much as you can by keeping them dancing during the music (A singing call is 3.5-4 minutes long). They will have to repair their square at the end, but that is OK.
TIP: Practice a broken singing call. Interestingly you can practice the recovery of a singing call. Just start a singing call as normal and then at some random point force yourself to stop singing and think of something else for a few seconds. Then try to repair using the strategies above (you can do this even with a ‘ghost’ square of no people except yourself). You will find that the FIRST time you do this you will be REALLY BAD at it. But after you do it 3 or 4 times, you actually get pretty good at it. This will give you confidence in ‘real dances’ that you can recover from ‘anything’ and that is a very good feeling.
TIP: Have ‘short’ figures memorized that you can use if dancers fall behind. It is pretty common, especially with older dancers and beginners that the dancers will not keep up with your singing call figure. This messes up the singing call because the music expects you to start each figure at a particular point, and the dancers are late. Thus you need a way of ‘catching up’. Conveniently, the figure in Boogie Shoes can help you do this. It consists of the following calls.
- Heads promenade ½
- Heads Square through 4
- Right and left thru
- Pass thru
- Trade By
- Touch a quarter ← You can drop these last two calls
- Scoot Back
Critically right before the ‘Touch a Quarter’ everyone is facing their corner so you can call ‘swing and promenade’ at that point, making the figure 8 beats shorter. This allows you to catch up. I call figures like this ‘expando’ figures because they can be shorter or longer as the need arises, and that is pretty helpful. Thus if you are calling Boogie Shoes and you are ‘way behind’ you can drop the ‘Touch a Quarter, Scoot Back’ and catch up. If that shaved off too much time, you can have the active couples ‘Come in to the middle and back’ before starting the figure to use up the extra time.
Another point is that the structure of a singing call is
- Opener
- 2 Figures (each of these advance the girls one position)
- Middle Break
- 2 Figures (each of these advance the girls one position)
- Closer.
Slow dancers will start to fall behind on the first figure. But you can substitute a short figure on the NEXT figure to catch up (it is OK to miss the start of the second figure). Your goal is to ‘catch the refrain’ when you are swinging and promenading on the second figure). If you need really short figures I suggest
- Square thru 4 (you can swing and promenade)
- If you need to kill a bit more time after the Square thru 4 call
- Swing Thru; Boys Trade (you can swing and promenade)
- If you need short, but not extremely short figure, after the Square Thru 4 call
- Swing Thru, Boys Run; Ferris Wheel; Centers Pass Thru (you can swing and promenade)
Finally know that you can ALWAYS substitute the following sequence for ANY of the Opener, Middle Break, or Closer
- Circle Left
- Allemande left
- Turn your partner right (or Dosado)
- Allemande left
- Right and Left Grand
- Swing and Promenade.
Notice this is the Opener figure for Boogie Shoes. Thus you likely already know it. It is also probably the single most common Opener-Break-Closer figure in square dance. What is beautiful about this sequence is that YOU DO NOT NEED TO BE HOME TO START IT. Thus if you are ‘behind’ you can simply use this sequence for the Middle-Break or Closer even though the dancers have not finished the promenade from the last figure.
This figure is also ‘magical’ because it can use more or less time based on how long you wait on the Circle left (Normally you circle left 16 beats which gets you all the way around). By simply calling the Allemande left sooner you can make the figure shorter and thus make up time.
TIP: In Boogie Shoes Use a Circle Left Middle Break or Closer to catch up. As written Boogie Shoes has either the girls or boys promenade at the break and in the closer. If the square is ‘behind’ this is not a great figure to call. So if you are behind at the middle break or closer, substitute a circle left figure and start it early before they get home. This will catch you up. You should practice this so that you can execute this ‘on the fly’ substitution with ease.
TIP: If you want the most ROBUST singing call, use one that you have practiced with a ‘circle left’ middle break and closer. This will allow you to catch up quickly. Grand Squares are NOT as robust (although experienced dancers can catch up), so avoid them if you want your singing call to work even with novice dancers.
TIP: Use the ‘Tap Tempo’ app and ensure your singing calls are 126 Beats Per Minute (BPM). The ‘Tap Tempo’ app is a FREE Phone app (both iPhone and Android) available in their app stores, that allows you to determine the tempo (BPM) of any music. You do this by listening to the music and tapping a button on the beat of the music (it is surprisingly easy and accurate).
Music players (like CallerBuddy or SqView) have the ability to adjust the tempo of the music so you can always hit exactly 126 BPM. Note that even 2 BPM faster feels FAST , and 2 BPM slower feels SLOW, so it is important to be accurate. You may wish to slow the music down a bit (but no more than 2 BPM) for older dancers or beginners, but I don’t actually recommend that (just use shorter figures as mentioned above). If you slow the music down you lose some of the ‘energy’ of the dance. Using shorter figures does not have this problem.
A Database of figures to use for Singing Calls
As we will discuss later, ANY set of moves that bring you to ‘near’ (often facing) your corner in about 36-38 beats of music can be used as a singing call figure. You will want to memorize a number of these. My favorites are in the spreadsheet Square Dance Figures. Often as a beginning caller, you memorize only one figure that you use 4 times and you never use another figure for that singing call. It is GOOD to start this way, because it AVOIDs ERRORS (calling is just like singing a song, it is ALWAYS the same EVERY time). However as you get better at calling you will want to use different figures. This introduces the potential for mistake, and the way to MINIMIZE this is to PLAN which figures you will use and WRITE THEM DOWN and refer to your notes during the dance (this is called programming the dance). I recommend using only 2 different figures for any particular singing call (not 4). The reason is that figures feel very different to the dancers if they swap heads-sides roles, so you don’t need unique choreography for 4 figures. Planning the 1 or 2 figures you will use in your singing calls has a number of additional benefits
- You can ensure that during the patter you use the singing call sequence at least once. That ensures that the dancers are ‘warmed up’ on the figure (really important for beginner dancers). It also allows you to see if the figure is too hard for the current set of dancers and switch to an easier figure for the actual singing call if you decide the dancers need something easier.
- You can ensure that you don’t overuse any single singing call figure (It is easy to ensure that you never use it more than once that night, adding variety to your dance).
TIP: If you use 2 figures, A and B, use them either AABB or ABBA (NOT ABAB). As mentioned figures feel very different to dancers if you swap the head-sides roles in the figure. However because the ladies are PROGRESSING after every figure, if you alternate the two figures (ABAB), then the ladies ONLY SEE one role of each figure twice. This is not ideal. If instead you start with the A figure twice and then the B figure twice (AABB) then EVERYONE will see each role of each figure exactly once. While this works, dancers will notice that you are repeating a figure. To avoid that, if you use figure A, then figure B twice and then go back to figure A (ABBA) then it is harder for dancers to see that you are repeating the figures but every dancer sees each role on each figure exactly once (just like AABB). I recommend always using the ABBA pattern for this reason.
More on the Structure of a Singing Call
As mentioned, a singing call consists of 7 parts.
- Opener
- 2 Figures
- Middle Break
- 2 Figures
- Closer.
Each of these sections (typically) is exactly 64 beats long. If you set your tempo to 126 beats per minute as suggested, then each section is .51 minutes or 30.5 seconds long. Thus a singing call is 7 * 30.5 = 3 minutes and 33.5 seconds long. Typically songs have 5-10 seconds of lead in time, and a similar amount of time at the end of the song, so a typical singing call is close to 4 minutes long (some with long lead times are over 4 min). Some singing calls might have a very short (e.g 4 beat) lead in for the Middle break or Closer figure (Boogie Shoes does this, check out the drum/horn pulsing right before the Middle break and Closer) . You may not even notice these, but they are handy especially for grand square figures because they give dancers a few more beats to ‘catch up’ if they are behind.
Because the 7 sections are ALL THE SAME SIZE it means that any figure for one section can be used in another. This is actually true even for the opener, middle break, and closer. This means if you make a mistake and accidentally miss one of the pieces (typically you forget if you are on the 3rd or 4th ‘progression figures’, or less commonly you skip the middle break). If that happens, just fill in the required piece that you forgot. The order doesn't really matter as long as you do a ladies progression figure 4 times.
It also means that if you sing the song with a grand square normally, but you are way behind, you can substitute the ‘magic’ circle left figure instead to catch up. I have done this many times when working with beginners.
Whether the heads or the sides start a figure never matters. It is traditional to call the first two figures with heads starting, and the last two figures with sides starting, but you don’t have to do that. Indeed when I call the same figure 4 times in a singing call, I tend to call Heads-Sides-Sides-Heads, because it ‘feels’ like there is less repetition. The main point, however, is that if you accidentally called sides when you wanted to call heads, just go with it. In general, correcting yourself never turns out well (It just breaks the floor), so just try to make the best of things given what you told the dancers. In the case of saying heads when you meant sides, there is nothing to fix.
Note that the CallerBuddy or SqView song playing tools also help you with the 7 parts of the singing call. Notice at the bottom there is a ‘bar’ that is divided into 7 sections (one for each part). This bar has a slider (see arrow below) that tells you where you are in those seven parts.

This is really handy near the end if you can’t remember if you should be doing the last figure or the closer. A quick glance tells you where you are.
Note that CallerBuddy or SqView are NOT doing anything sophisticated to divide the song up into 7 parts. It simply takes the total time of the song and divides it into 7 equal parts. This means that it is not accounting for the lead in and trail out parts, and thus these sections will be a ‘bit off’, but this bar IS useful for just knowing (roughly) what section you are currently in.
Singing call Structure WITHIN a figure
As mentioned, each of the 7 parts of a singing call have 64 beats of music. These 64 beats very naturally break up into 8, 8-beat parts. If you look at song sheets, you will typically find that all the figures have 8 lines (this is true for Boogie Shoes). Each line is 8 beats. Notice that the last two lines are always some chorus, and take 16 beats which is used for the promenade (it takes 16 beats to go around the square). Before the chorus is a swing that takes 8 beats. That leaves 64-16-8 = 40 beats of music for the rest of the figures. Thus IN THEORY you have 40 beats of music for choreography that gets you to your corner so you can swing and promenade. In practice, 40 beats of choreography is an upper bound that you use for very energetic dancers who want to move. It may feel exhausting to many people. 36-38 seems to be the ‘sweet spot’ for good, competent dancers. Beginners are slower and usually only handle 32-34 beats of choreography or they will fall behind.
Note that actual song lyrics tend to be in 16 beat ‘sentences’. This is why the chorus during the promenade is 16 beats. This is why you tend to circle left for 16 beats, because it allows you to sing one full 16 beat ‘sentence’ of the lyrics. Thus you have 2 ½ of these ‘sentences’ (40 beats) in your choreography before you tell them to swing and promenade. Typically you can ‘feel’ these 16 beat transitions, and they can help you keep your choreography on track.
Filler Words are your Friend
You will note that in the figure for Boogie Shoes, there are filler words like ‘go all the way and do a right and left thru’. Those words are important, because beginner callers often do NOT LET THE DANCERS HAVE TIME TO DO THE CALL. A square thru 4 takes 10 beats, which is a lot longer than it takes to say it. This leads to the following tip
TIP: When you are first practicing a new figure with a singing call, DANCE it yourself (with ghosts) as you sing it. That will FORCE you to put appropriate pauses between the commands. Ideally you come up with ‘filler words’ to fill the silence because that ensures that you KEEP those pauses (just having a pause is fine, but it is easy to forget how long the pause should be, filler words force you to remember the correct space between commands).
TIP: When coming up with filler words, make sure commands are early enough. Chain down the line takes a lot of time so some filler words are in order, but if you call ‘and then do a chain down the line’ notice that the command is LATE which is a BIG PROBLEM. The COMMAND needs to come early, so filler words need to come LATE, thus ‘chain down the line, turn the girl and don’t be late’ is a better set of filler words.
TIP: MODIFY the song sheet in your Music Player. If you use CallerBuddy or SqView to play your music and bring up your lyrics (more on that later), you will want to MODIFY the lyrics to use your preferred figure and your filler words. SOMETIMES the lyrics that come with the song are fine, but more often than not they need to be modified. DO THIS MODIFICATION. You will forget all the subtle changes you made a couple months ago if you don’t write the changes down, and you really do want as much help from the lyrics as possible.
Equipment and Software You will Need
Once I was part of a large group of square dancers that was visiting a tourist site, but there were not enough buses to take us home. Thus some of us had to wait a significant time (over an hour) for another bus. There were callers in our group and enough room to dance, so they put on an impromptu square dance singing a cappella. It was very cool, but in real life you need some equipment. This includes
- A microphone and cord
- Something to play the music (usually a computer, but some people use a phone)
- A mixer / amplifier that combines the mic and music and amplifies it
- Speakers to turn it into sound.
Sometimes the hall where you square dance provides the mixer, amplifier and speakers, so all you need is a microphone, its cord, your computer, and probably another small cord that connects the computer to the ‘house’ mixer. This is the typical situation at square dance festivals. Thus at a minimum you need
- A microphone, and cord
- A computer/phone and software to play music
- A short cord that connects your computer to the mixer.
It turns out that the square dance community and sound professionals BOTH have standards for these cords but they are DIFFERENT STANDARDS and that can cause some grief. Let’s talk about those details.
Buying a Microphone
You might get lots of conflicting advice about microphones. The price for microphones also varies WIDELY. You can buy a $10 microphone or a $200 one. You can buy them on Amazon, or at any good musicians store (e.g. Guitar Center or the like). I don’t have strong feelings on the matter but I will say
- The standard for GOOD microphones is an XLR connector. It is good to adopt this standard. It has existed for many decades and there is no reason for it to change.
- It is GOOD not to buy the very cheapest of anything when you are concerned about quality. It is often not clear why you should buy really expensive stuff, but if you buy the very lowest end stuff, it is very likely to disappoint you in ways you will only find out after the purchase.
- It is OK to buy lower end things first, then upgrade if/when you feel the need. This gives you time to understand what you value and make a WELL INFORMED choice later (when it is clear you will value the new version you will buy). If on the other hand you don’t end up calling a lot, buying the lower end saves you money. 99% of calling is about YOU not your mic.
So my advice on microphones is that you buy an inexpensive, but not rock bottom XLR microphone. This is enough for the start of your calling career, and if you continue, you can upgrade if you wish.
Common problems with Microphone Cables
Professional Microphones typically have a three-prong connector called an XLR Connector.
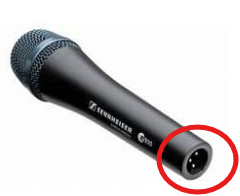
Microphones need THREE prongs rather than TWO because they are what we call ‘balanced’ sources. It turns out that you can SUPPRESS noise by splitting your signal into two equal and opposite pieces with a common midpoint typically called ground or neutral. External noise typically gets induced on BOTH pieces but since signal is the DIFFERENCE between the two pieces the noise (which is the same in both lines) cancels out. You don’t need to understand that, but the point is that three wires is better than two when the signals are SMALL (like they are for a microphone).
Unfortunately, square dancing started long ago before balanced microphones were the standard. The square dance community standardized on Hilton equipment, and it used an UNBALANCED (2 wire or prong) ¼” connector.
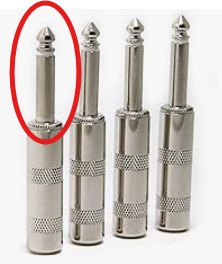
Notice that this connector only has two contacts (the TIP (the part above the white insulator), and the SLEEVE (the shaft below the white insulator)). This is the standard for most square-dance only equipment.
Now when you buy a ‘normal’ cable that will take an XLR connector on one side (for the mic) and a ¼” audio cable on the other end (for your mixer/amplifier) it will have THREE wires and its connector will look like this
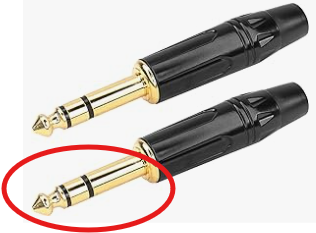
Notice there are TWO insulating bands (this time black), and thus THREE prongs (just like XLR), so the tip and the ring are the signals, and the rest of the shaft (the sleeve) is the neutral or ground.
Unfortunately if you plug such a cable (which is providing a BALANCED signal) into Hilton equipment (which is expecting an UNBALANCED signal) bad things happen including
- You get very poor signal (you have to turn the amplifier way up to hear anything)
- You get lots of noise (lots of crackling, hum or other noise).
The reason is that when you plug your balanced (3 pin) jack into the unbalanced (2 pin) amplifier one of the pins is ‘floating’, not connected to anything (which is where the noise gets in). Often this is blamed on a ‘bad’ cable. There really is nothing wrong with the cable (it is doing what it was designed to do) it is just the WRONG CABLE.
What you need is a cable that converts from a BALANCED XLR connector to an UNBALANCED ¼” audio cable. This is actually pretty easy to do, you just connect one half of the signal to neutral (that is, you short the middle ring to the sleeve (or short XLR pins 1 and 3)). If you are handy with a soldering iron you can do this yourself. You can also buy cables that have this already done. Here is one on Amazon, but I am sure you can find them in many places.
XLR to UNBALANCED ¼ Audio Cable
The main point is that if you are having trouble getting your mic to work with Hilton equipment. It is VERY LIKELY it is because you are using a BALANCED cable to connect them. If your ¼ plug has three sections (and you did not modify it), it is likely a BALANCED cable and it is the source of your problem.
Note that the cable that converts to UNBALANCED will work in more modern audio equipment (e.g. pretty much any mixer you will buy). HOWEVER you have sacrificed ½ your signal (because a converter cable simply shorts out half the signal), and it also sacrifices any noise canceling (the whole point of having a balanced system). Thus if you routinely work on BOTH Hilton (unbalanced) equipment as well as modern (balanced) equipment, it would not be a bad idea to have TWO cables (one converts and the other does not, properly labeled) so you can be optimal for both.
Connecting Your Computer/Phone to the Mixer/Amplifier
Thankfully the other cable you need is much less problematic than microphone cable. The reason is that the signals from the computer are MUCH larger than what a microphone produces so noise is not an issue, so the standard is UNBALANCED for everyone. The size jack is 3.5mm (slightly larger than ⅛”) and is standard. Most cables are STEREO (they have three conductors and their plugs have two insulating bands). We really don’t need the STEREO feature (all square dance music has identical left and right channels). But stereo is the standard, and it does not hurt, so everything is fine. You probably want a 3-4 ft cable length (any more and the cable tangles).
Note that some phones and some computers no longer have a 3.5mm audio output (they assume that you will use Bluetooth to connect audio devices). The good news is that for very little money (e.g. $10) you can buy a USB to 3.5mm audio converter (it looks like a short cable) that you can plug into your computer or your phone. Note that more modern devices will use a version of USB called USB-C, which distinguishes it from the older (larger) USB-A (or just USB) connector. Be sure you get the right one for your device (nowadays, most computers have BOTH USB-A and USB-C).
Getting a Mixer/Amplifier/Speakers
So far you have invested in a Microphone, cable, and audio cable to connect your computer or phone to OTHER PEOPLE’s amplifiers/speakers. However you are likely at some point to want to call a dance somewhere that does not have audio equipment on site. For that you need your own Mixer/Amplifier/Speakers.
Now old-school calling equipment (Hilton) was VERY expensive in its day (at least hundreds of dollars). You can now often find used equipment that is a fraction of the price but STILL EXPENSIVE by modern standards. Basically Hilton equipment has not changed in decades, but electronics has, and it has gotten a lot cheaper.
I happened to luck out and be GIVEN old equipment, which is what I use, but it is STILL HEAVY (lots of particle board in that stuff). I have seen numerous callers invest in a mixer and powered speakers (sometimes wired, sometimes wireless), which is certainly an option. But I am a bit thrifty (cheapskate) and I would like to discuss the merits of buying a Portable PA Speaker.
Here is one on Amazon for $60
PA stands for Public Address, and these systems are basically designed to be used outside (thus powered by built-in rechargeable batteries), to combine a microphone and music (exactly what is needed) all in one easy to carry package (and for $60).
Because the price is so low, even if you decide later that you want better equipment, in the time you used it you very likely got the $60 of value out of the purchase. I also think there are plenty of times where convenience is more important than audio fidelity, so you are likely to use it on occasion even if you end up investing in better equipment.
The Taminations Sequencer Is INDISPENSABLE
You may already know about the FREE Taminations web site as a reference guide of square dance calls. There is also a Phone FREE version of this for both Android and iPhone in their respective app stores (search for Taminations). What you may not know about, is that Taminations has a tool called the sequencer, that lets you visualize choreography. Old school callers use 8 small items typically called ‘checkers’ or ‘dolls’ that represent each of the 8 dancers which they would move around manually to simulate choreography. However that technique was always very slow for me (since you have to move all the pieces) and ERROR prone (you can easily not perform the move correctly with your checkers, or lose track of where you are in the sequence you are designing). I LOVE Taminations as an alternative.
To get to the Taminations web site, go to the site
www.tamtwirlers.org/taminations
Note that if you just search for ‘taminations’ you will get links to the APP (which you will want to use on your phone, but do NOT need to use on your PC). You will also get web sites associated with the tamtwirlers square dance club (who developed the software), which is also not what you want (but it will have a link to the website you want). When you find the correct link you will see a display like the one below
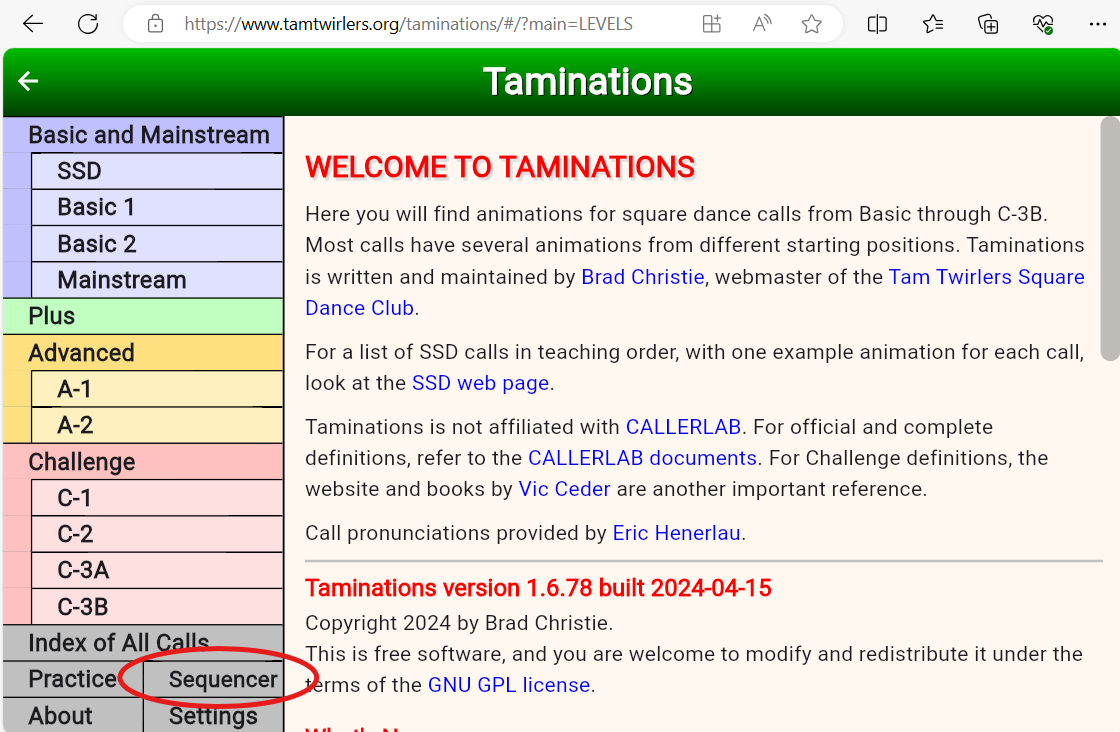
For our purposes the interesting part is the sequencer and you can get to it by clicking the button labeled ‘Sequencer’ in the lower left region of the window (circled in the image above).
When you enter the sequencer, you get a display that looks something like this:
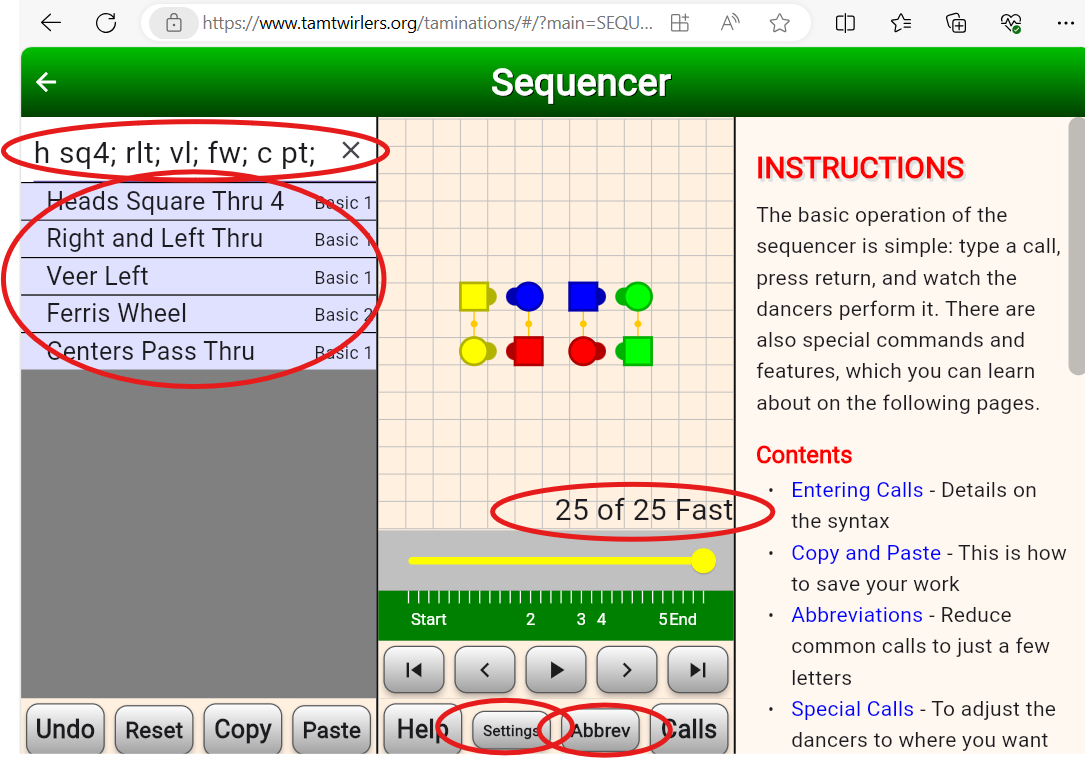
Notice it has a data entry box in the upper left corner, in which I have already typed the abbreviations for 5 calls separated by semicolons ’;’. Hopefully these abbreviations are intuitive, but even if they are not, when I hit the <enter> key the sequencer processed these abbreviations and has the full name one per line in the area below the input box. To the right are figures of the 8 dancers (reds are the number 1 couple, and yellows are the corner couple (number 4 couple)). Notice that everyone is facing their corner, so you could call ‘allemande left’ at this point (or use it in a singing call and swing and promenade at this point).
The sequencer keeps track of how many beats the move takes and gives you a tally (in this case this sequence is 25 beats long), Below the animation of the figures are controls that let you ‘run through’ the sequence. The sequencer animates every movement so you get to see the ‘flow’. You can also click on any particular dancer and it will show you the path that dancer took (to see if the choreography is too ‘spinny’ or only involves ½ the square). Good choreography has figure 8s in the path that dancers take because the left and right rotations cancel out dizziness. We also like it when dancers use both sides of the square (otherwise you are interacting with just 4 people instead of the full 8).
TIP: Increase Dancer Speed in the Sequencer. The default speed for the dancer animations is too slow. You can fix this by clicking the ‘settings’ button and then selecting the ‘Fast’ ‘Dancer Speed’ button. While you are in the settings, I like to turn on the ‘Grid’ feature (just draws a grid on the dance floor), but that is definitely optional. These settings will be remembered from session to session.
Adding more Abbreviations to the Sequencer
The sequencer is great, but you REALLY want every call that you use in the sequencer to have an abbreviation. By default the sequencer only has about 40 abbreviations, and VERY COMMON calls like ‘star thru’ do not have abbreviations. You will want to fix this. This brings us to my Square Dance Figures spreadsheet. This is a spreadsheet that shows useful singing call figures for various levels of square dancing (Mainstream, Plus, Advanced) as well as other useful information, each on its own ‘tab’ (see the bottom of the display to see the tabs). One of these tabs is the ‘Abbrev’ tab that has a list of square dance call abbreviations. The following link
Abbrev Page of Square Dance Figures
Will take you directly to this tab. It should look like the display below.
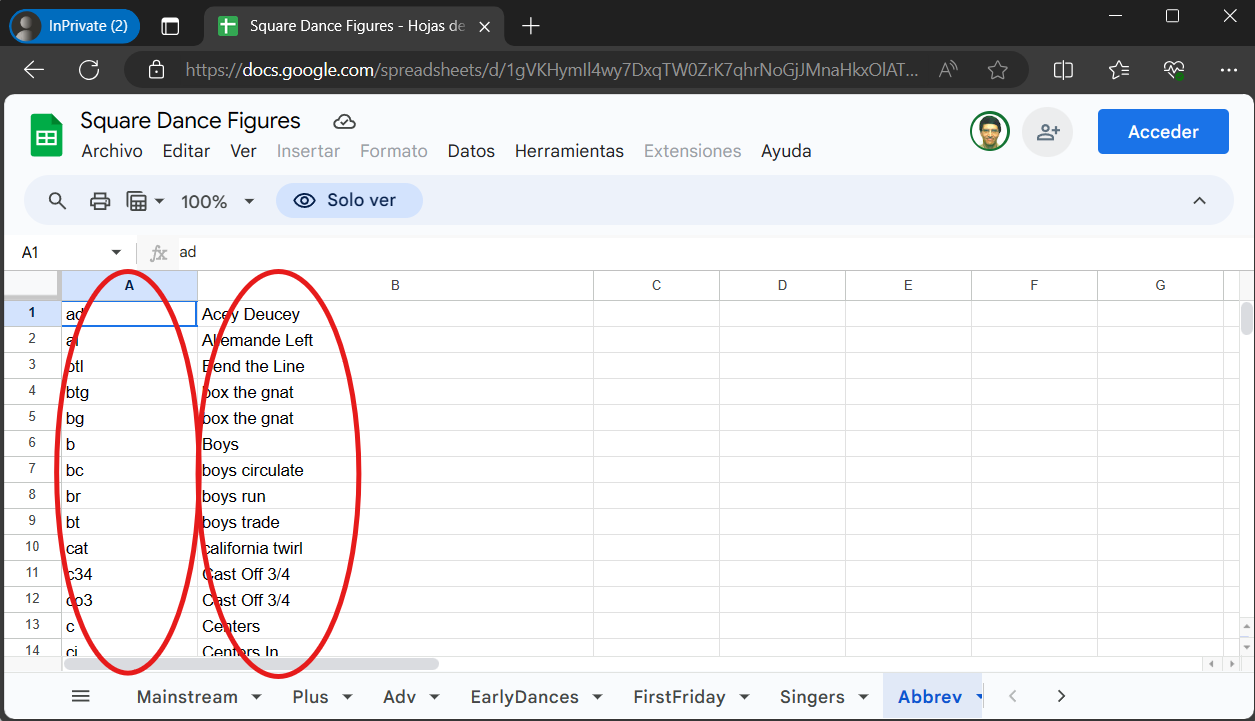
To load these abbreviations into the Sequencer, first select EVERYTHING in the ‘Abbrev’ tab of the spreadsheet by typing Ctrl-A (which selects everything on the page) followed by Ctrl-C (which copies it to the clipboard). (On an android phone, tap on any cell and it will surround the cell with a blue selection box. Then tap the upper left grey box (it is in the same row as the column headings). This selects all the cells. Press AND HOLD on any of the cells and it will bring up a menu. Select the ‘copy’ entry).
Now open the sequencer and click the ‘Abbrev’ button at the bottom of the display. This will cause the right pane to be populated to the CURRENT set of abbreviations. The right pane also has 4 buttons at the bottom, one of which is ‘Paste’
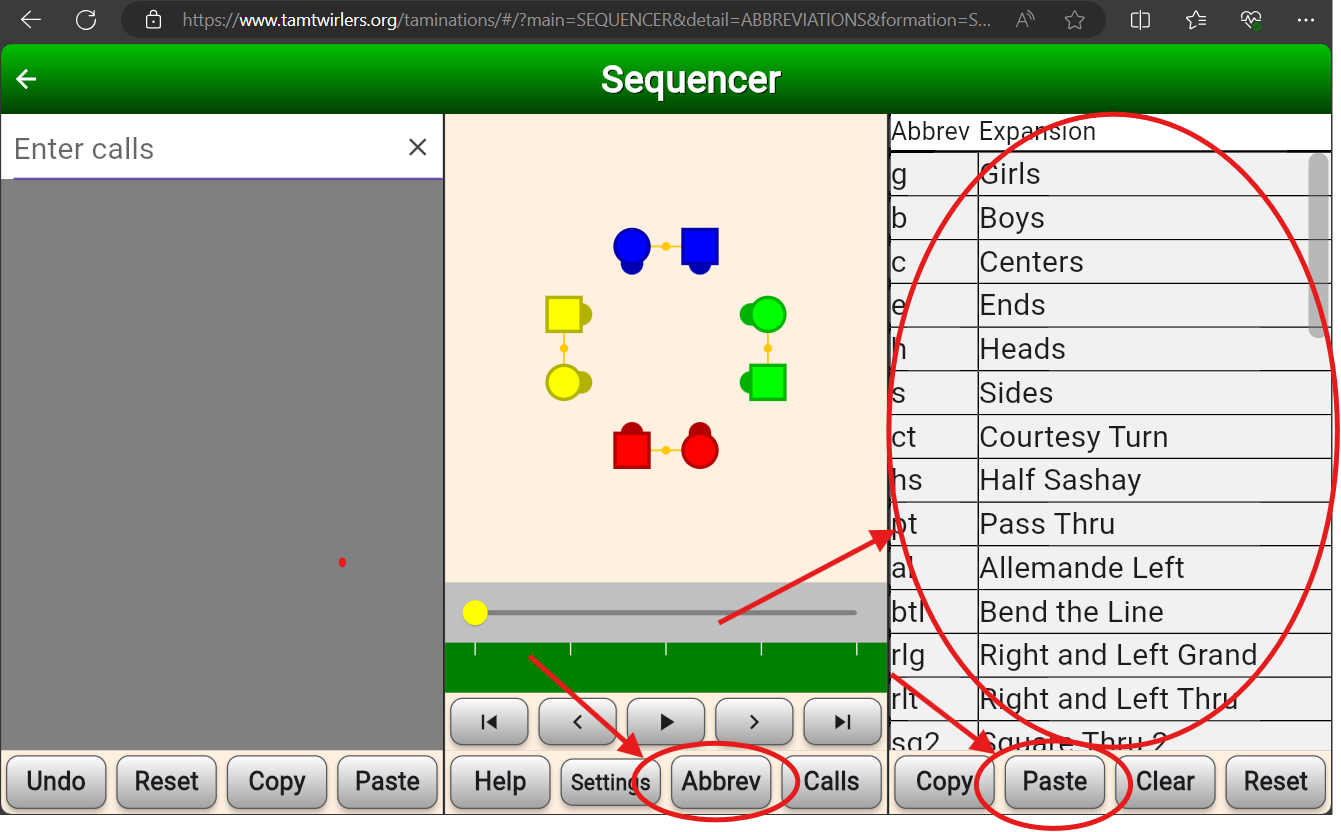
Click the ‘Paste’ button. It will issue TWO confirmation dialogs, Click OK to the first dialog
And ‘Allow’ for the second (which the web browser forces on you).
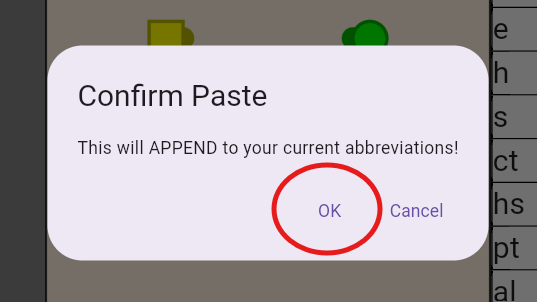
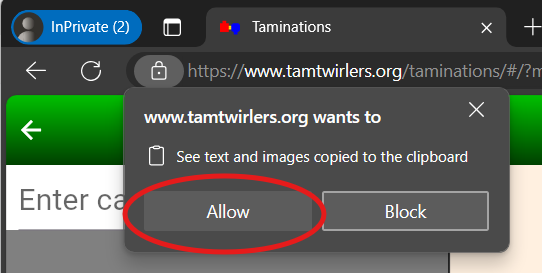
If you are successful you will see many abbreviations in the right pane. (you will have to scroll to see them), Note that you can click the ‘Expansion’ column heading at the top to sort the list by the full name of the call, which will make it easier to find an abbreviation in the future.
At this point you have set up Taminations enough to be useful. When you look at figures in the Square Dance Figures spreadsheet you can cut the text from the sequence and paste it into taminations, to ‘run’ it.
What is the Sequencer Good for?
The main thing that the Taminations sequencer is good for is to allow you to ‘practice’ calling without needing 8 people to form a square. In particular it helps you memorize singing call sequences. For example the singing call sequence used in Boogie Shoes is in Square Dance Figures spreadsheet with the name PROM-SQ4-TQ-SB and has the sequence
h prom 12; h sq4; rlt; pt; tb; tq; sb;
Which hopefully you can read (see image of Taminations below if you can’t guess it). From here on I will be writing sequences of calls using these abbreviations. The nice thing about doing this is that you can cut and paste this sequence into the sequencer to make sure it is ‘correct’ (a legal set of calls), and determine how many beats of music it needs. This sequence needs 37 beats, which is in the sweet spot of 36-38 beats for a singing call. If you cut and paste this sequence into taminations and hit <Enter>, it will run the sequence and leave you with the following display
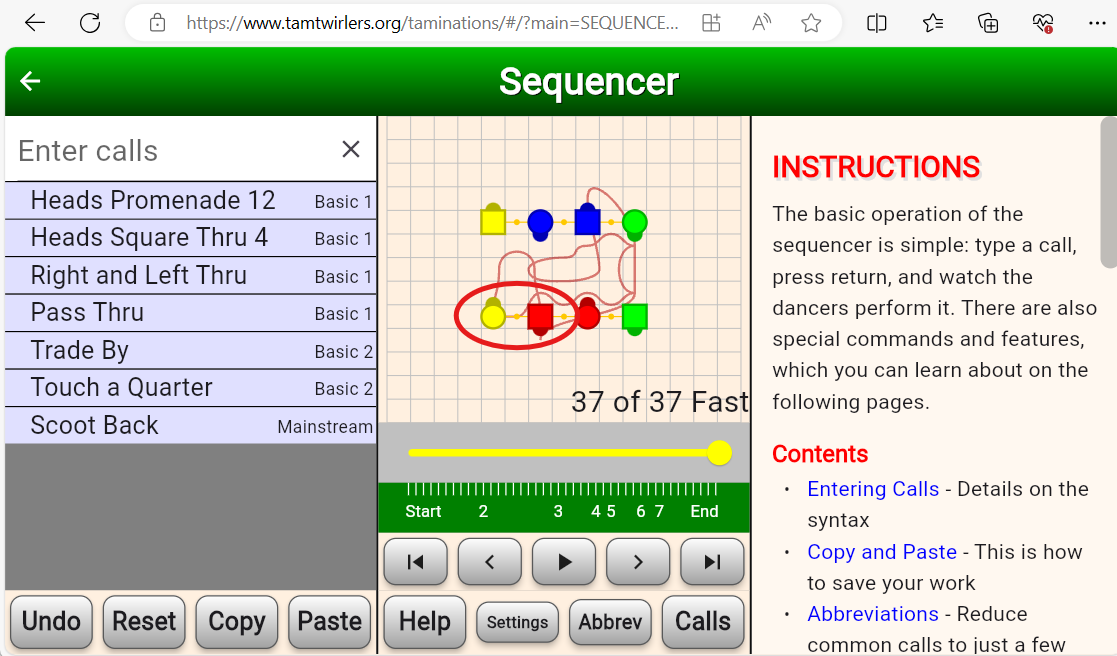
Notice that the #1 boy (red) is in a wave next to his corner, the #4 girl (yellow). Every other person is also next to their corner (you can see this because if you IGNORE the facing directions the figures resemble a squared set (reds on bottom, greens to their right, then blues and finally yellows). This means you can call ‘swing and promenade’ legally. In the example above I have turned on trace tracking for the #1 (red) man by clicking on him in the figure. Notice that the head man roams all around the square. This is a sign of good choreography. If you click on any of the side people you will see that they do not move around much at all. This is why it is fine to use only two distinct figures in a singing call. As you can see the experience of the sides is very different than that of the heads, and it is more ‘fair’ if you let everyone get to have both experiences. As mentioned because the ladies are progressing on each figure, to be fair to them an ABBA sequencing of figures is best.
While this figure works well for singing calls, it would be BAD to call ‘allemande left’ at the end of this figure because although everyone is close to their corner, they have RIGHT hands with each other, and if you call allemande left you force them to switch hands in an awkward way. Thus if you want to ‘practice’ this figure during the patter (a very good idea), you will need a way of getting to a formation where you can do an allemande left. This is what the ‘Ends’ column in the Square Dance Figures spreadsheet is for. It tells you the formation in which the figure ends. ‘c-box’ is one of the more common ones, which stands for ‘corner box’. This is the formation after you have done a square thru 4 (everyone is facing their corner). Another common one is ‘lines-out’ which are lines facing out and everyone is next to their corner. You can do an allemande-left from there. However our ‘Boogie Shoes’ figure ends in ‘gbgb-wave’ which stands for girl-boy-girl-boy waves (right handed is assumed). This distinguishes it from ‘bggb-wave’ which is what you get when you step to a wave from normal couples. In neither of these waves is it a good idea to immediately call an allemande left. You need a sequence to ‘fix’ things. There are many of them, but here are two of the simplest.
- For gbgb-wave - br; sq3; (boys run; square through 3)
- For bggb-wave - st; br; fw; c pt; (swing thru; boys run; ferris wheel; centers pass thru)
So in your patter, when you are doing a ‘trial run’ of your singing call figure, if the figure ends in waves, you know what to append during the patter so that you can call allemande left. For boogie shoes I would call
h prom 12; h sq4; rlt; pt; tb; tq; sb; br; sq3; al;
Memorizing singing call figures
You will want to memorize a bunch of singing call figures. You will use them in singing calls, but you will also use them in PATTER. You do this because it is GOOD to ‘dry run’ the figures you will use during the singing call, but ALSO because you have to REMEMBER who your focus couple is and who their CORNER is. As mentioned previously you do this by NOTING it at the start, and then FORCING yourself to FIND these people every 3-5 calls. (basically twice during a singing call figure). Because you have MEMORIZED the singing call figure, and have used it ENOUGH MANY TIMES that it is HARD for you to mess it up, the fact that you are concentrating on finding corners and partners will not cause you to mess up the sequence. If you keep reminding yourself who your focus people are over two or three singing call figures, you will have MEMORIZED the partner-corner people enough so that you can mess the square up, and be reasonably certain you can resolve it.
Singing call figures also often masquerade as what is called a ZERO (a sequence that returns people to where they start). Because many singing calls START with a SQUARE THRU 4 (or an equivalent (we will talk about this more later), and END in a c-box (which is where a SQUARE THRU 4 ends), the part between the SQ4 (or equivalent) and the end is a ZERO. Thus you now have a set of useful ZEROs that you can use to make longer sequences (by just stringing them together).
Note that these singing call sequences are BETTER than things you come up with on the fly because
- They have been pre-vetted to have good properties like using both sides of the square, using appropriate hand alternation, and general flow.
- Callers tend to use similar singing call figures, which means the dancers have been exposed to these sequences, which means that they will be MORE successful (they have some muscle memory for it). More experienced dancers who are craving choreographic ‘surprises’ might be disappointed, but BEGINNERS will LOVE you for it. This just means you need to know your audience and choose an appropriate mix, but some fraction of your patter should always include these good, ‘tried and true’ sequences.
- It is VERY easy when ‘just calling’ to fall into a ‘rut’ where you tend to avoid some calls and use some calls too frequently or rely on just a few ‘cliche’ sequences. By having a good number (ultimately dozens) of figures that are KNOWN to have some ‘interesting’ calls in them, you avoid falling into this rut.
In short, it is good to memorize ‘a bunch’ (ultimately dozens, but initially 4-6 is fine). You do this by finding ‘good’ figures (that is what the Square Dance Figures spreadsheet is for), learning some of them, and then opening up the sequencer and then saying (and typing) the figure into it from memory. Start with 4 of them, and just keep reviewing them until you can’t help but get them correct. You can put on some music and ghost dance to your figures (so you get the timing right). Once you are solid on the first 4, expand your figures until you know at least a dozen and ultimately 2 or 3 dozen.
Details on the ‘Square Dance Figures’ spreadsheet
When you open the Square Dance Figures spreadsheet up to the Mainstream tab you will see something like this
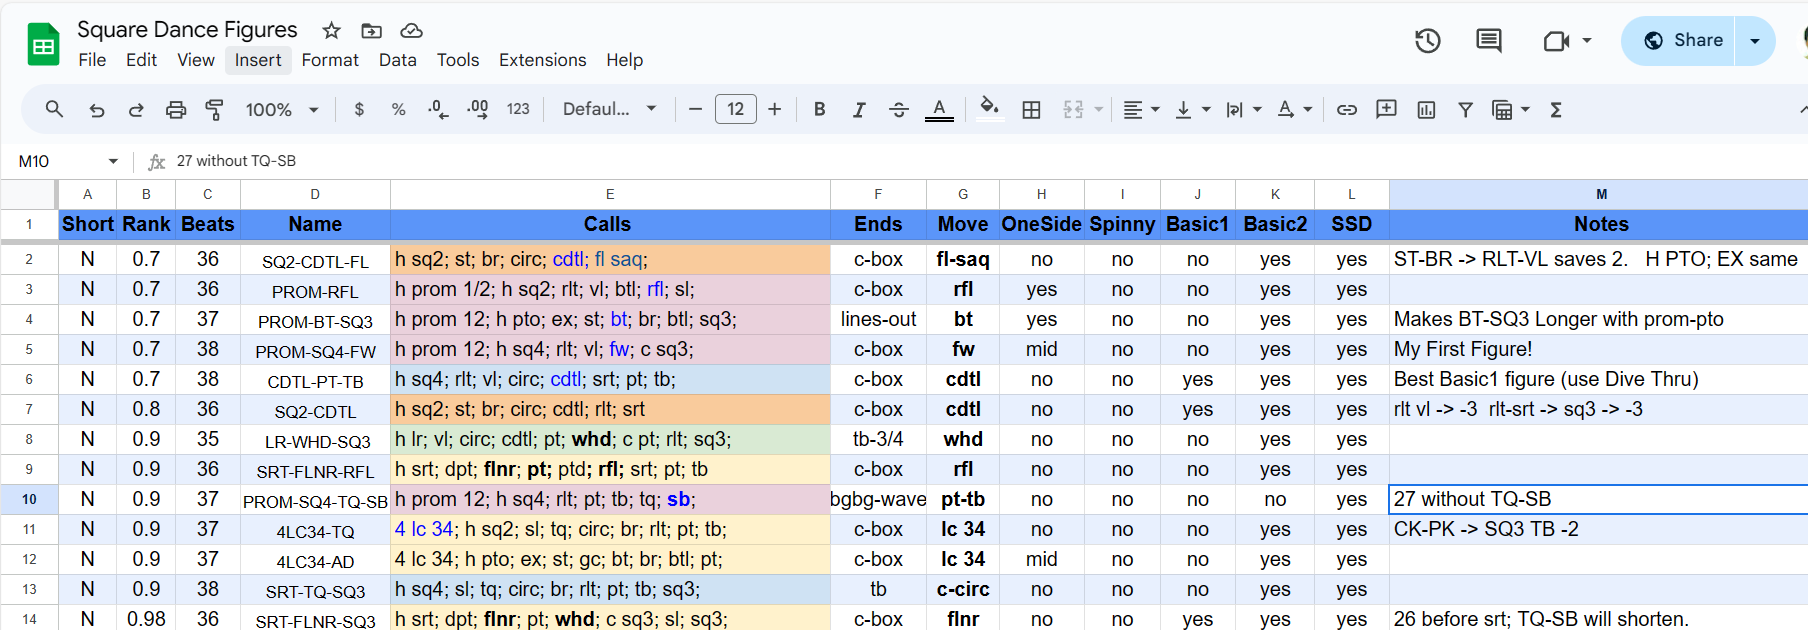
The heart of each row of this spreadsheet is the ‘Calls’ column. This is the sequence of calls that make up the figure. These use the Taminations abbreviations and can be cut and pasted into Taminations unmodified. Notice that this column is color coded. This color coding represents the START of the figure:
- Orange - starts with h sq2
- Pink - starts with h prom ½
- Blue - starts with sq4
- Green - starts with lr (lead right)
- Yellow - starts with something else
The value of the color code is that figures that start differently feel more ‘different’ than figures that vary in the middle or end. Thus patter having a variety of colors and no colors back to back is good.
The most important point of this spreadsheet is that it is CURATED. There are other places where you can get square dance choreography (e.g. see Vic Ceder Choreography Database), but when you are starting out you want to concentrate on learning GOOD figures, that are EASY to dance to, and are POPULAR. This is what the rank column does. The lower the number the BETTER figure, and the list is sorted by rank, and within a rank it is sorted by the number of beats used. Thus when you are learning, start with THE FIRST FIGURES in this list.
Rank is certainly subjective, but figures don’t get to be rank 1 or below unless they have PROVEN themselves to be ROBUST in practice. This means that figures that use less common MAINSTREAM calls (e.g. dixie style, cloverleaf, spin chain thru, walk and dodge) typically do NOT have very low rank because they do tend to give some part of the floor trouble (they need to be used with care and you need to ‘warm up’ the floor before using them). It is good to learn these figures too, but your most robust singing calls tend to use only basic calls.
The figures have names, which are pretty arbitrary, but I try to name them based on their most ‘notable’ calls, and include enough secondary calls to keep them unique. The main reason to have names is so you can HIDE the ‘Calls’ column, and look at the ‘Names’ column and based on the name test your ability to recall the full sequence.
The number of beats needed for the sequence is in the ‘beats’ column. You will notice that most are in the ‘sweet spot’ range from 36 to 38. There is also a ‘Short’ column (Y or N). ‘Short’ sequences are those that are 34 beats or less. You don’t want to use these for ‘normal’ dancers. They are for beginners, older dancers, or to catch up after a mistake. You will want to memorize 2 or 3 of these of varying lengths so you have them when you need them.
The ‘Ends’ column tells you the formation at the end of the figure. Many are c-box (corner box) but all of them are appropriate to suffix with ‘swing and promenade’. They also are all designed so that you need to promenade between ¾ and 1 full rotation of the square (which is what the normal timing expects for the chorus during the promenade).
The ‘One-Side’ column indicates that the figure only keeps dancers on one side of the square. This is a bad thing, so generally there are very few of these.
The ‘Spinny’ column indicates that some dancers are rotating more than is good. There are VERY few such figures in the list because I usually delete them. Sometimes, however, the figure has enough merit that I keep it, but I would use it sparingly.
The ‘move’ column indicates the most interesting call in the sequence. This is handy when you want to ‘highlight’ a call during a tip, or just to ensure that over a dance, you use a nice wide variety of calls.
There are a number of columns, Basic1, Basic2, SSD, that indicate whether this figure can be used for dances that are restricted to those square dance levels (useful for beginner dances). There is a whole other page called ‘Early Dances’ (see tabs at the bottom of the page) that show figures for dancers that have not even finished Basic1. These are useful when you are teaching lessons (and notice on that page the figures only have 32-34 beats because beginners need more time (fewer calls), to be successful.
Finally there is a ‘Notes Column’ that is additional information about the figure. Often it will give you ‘variations’ on the figure that indicate that you can swap out a chunk of the figure for something else and it will change the number of beats by a certain amount. For example st-br -> rlt-vl => -2 says you can replace st-br (swing thru, boys run) with rlt-vl (right and left thru, veer left) in the sequence and it will reduce the figure by 2 beats. That is useful if you discover the dancers were slow on the first figure and you need a slightly shorter figure for the next figure to catch up. Knowing these equivalents (that st-br is equivalent to rlt-vl) is VALUABLE knowledge that allows you to reuse the figure in ways that ‘feel’ different to your dancers.
Learning to Resolve a Square
Up to this point we have mostly been discussing singing calls. This is appropriate because learning to perform a singing call is easier, and frankly more impressive (dancers like their singing calls, and if you perform with energy without mistakes they will be happy). At the start, you can often get away without performing patter at all (as a guest caller you can ask just to do the singing call, or you can do two singing calls to form your tip).
However, fairly quickly you will need to know how to do patter. The good news is that you can approach this in steps, and you can ‘work up’ to resolving an arbitrarily messed up square. Along the way you will learn a few REALLY USEFUL properties of square dance choreography that will make you a better caller.
The first stage of square dancing calling is to do patter with MODULES. The basic idea is that you memorize sequences that do particular things called modules, and you string the modules together to create choreography. The good news is that you have already learned some modules (your singing call figures) and you can make new modules out of old ones ‘on the fly’ by remembering a modest number of ‘equivalents’.
The concept of ‘Across the Street’
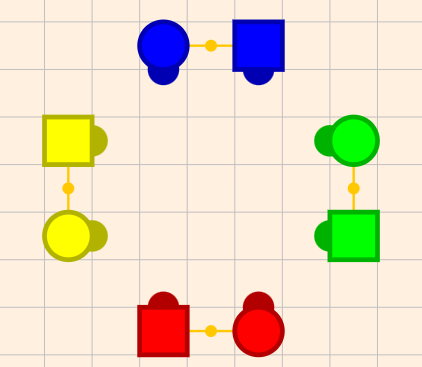
When you do a ‘Head Square Thru 4’ (h sq4) you bring the square to a formation known as a corner box (everyone is facing their corner and you can do an allemande left). Take a look at the original squared set (on the left) and corner box (right)
| Squared Set | Corner Box (after SQ4) |
|---|---|
 |
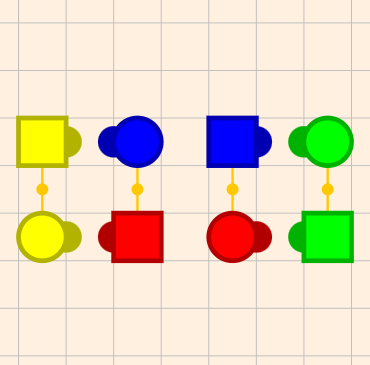 |
Notice that from a corner box if the heads were to ‘face in’ and step back you would reform the squared set. Thus a h-sq4 just ‘squishes’ the square without actually changing the order of anything. Thus the square is not really messed up at all.
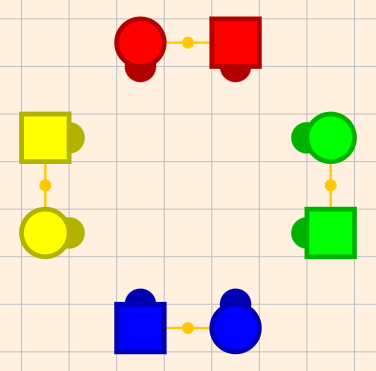
Our goal initially is to see if we can make choreography that LOOKS like it is messing up the square but is not REALLY messing up the square. That way we as a caller are ‘IN CONTROL’ but the dancers don’t recognize that they are really following a very simple pattern. The simplest way of ‘slightly messing up a square’ is to have heads promenade half. Here is what this looks like and what happens after we do a h-sq4 after the h-prom-½.
| After H PROM ½ | After H PROM ½; SQ4 |
|---|---|
 |
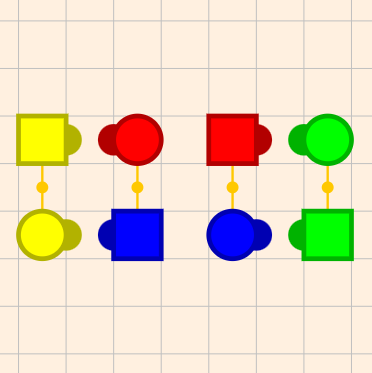 |
In square dance each man has his partner, corner (to his left), opposite (across), and right-hand lady (to his right past his partner). When we have the heads promenade ½ it sets it up so that everyone is near their ‘right hand’ person. Notice that a h-sq4 again just ‘squishes’ the square. So this square is ‘messed up’ but not by much (you are only a promenade ½ from being in order).
This formation is called being ‘across the street’ because if the sides were the street, the heads crossed to the other side of that street. Notice all we needed to do to get there is ONE CALL (promenade ½), so it is EASY to get across the street. Notice that if the caller called an ‘allemande left’ from ‘across the street’, everyone would get their partner back but someone (head or sides), would have to promenade through the middle (effectively doing a promenade ½) to get home properly. You have undoubtedly been in squares where this has happened, as it is BY FAR the most common way resolution fails.
Now you might guess (and you would be right) that because there is no IMPORTANT difference between the heads and the sides, we would like to not worry about formation differences between asking the heads to do something and asking the sides to do the same thing. If we were to ask the sides to promenade 1⁄2 and then square through 4, the formation would look different (the lines would be oriented on different walls, and different people would be on the ends or centers), but what DOES NOT change is that everyone is NEAR their ‘right hand person’ rather than their corner. So we define ‘across the street’ as being ‘next to’ your right hand person. This definition works whether the heads or sides did the action.
What makes being ‘across the street’ a powerful concept is that there are MANY ways of getting there (and they all are equivalent). By far the most common is the following sequence
rlt; pt; tb; (right and left thru; pass thru; trade by).
Thus
h prom ½       - gets you across the street
sq4            - squishes the square
rlt; pt; tb    - crosses the street again.
When you cross the street twice, you are back where you started, so you are in a ‘squished’ square and everyone is near their corner, so you can call allemande left.
Congratulations! You have made your first very nice patter sequence (this one took 29 beats). You will notice that this is actually the start of a number of common singing call figures (they just need a small ‘zero’ at the end to use up some time before swing and promenade). This is EXACTLY what happens in Boogie Shoes.
What is a Chicken Plucker (CKP) sequence?
Sequences that take you from a corner box to ‘across the street’ for historical reasons are called ‘chicken pluckers’. The story I have heard (and I DON’T vouch for its authenticity), is that hay balers were called ‘chicken pluckers’ because they had arms that compressed the hay that looked like they were grabbing feathers and flinging them out (the hay balers were probably shedding fragments of hay that suggested this). One of the most common ‘across the street’ sequences in the early days of square dancing was ‘right and left thru; dive thru; centers pass thru’. This sequence makes the dancers bob up and down (because of the dive thru), and some caller thought the dancers reminded him of a hay baler in operation so he called the sequence a chicken plucker, and the name stuck.
Note that there is some ambiguity among callers whether a chicken plucker is a sequence that just takes you across the street, or whether it is a sequence that takes you across the street and back again. Thus some callers might say it is ½ of a chicken plucker that takes you across the street.
In this document I will uniformly use the term ‘Chicken Plucker’ (abbreviated CKP) to be a sequence that takes a SQ4 formation (a corner box) to just across the street (not there and back). Thus in this document, rlt; pt; tb; is a CKP. (it is probably the most common chicken plucker).
The Joy of SQ2
When I first learned to call I NEVER used square thru 2. However then I realized something
Sq2 is equivalent to a Sq4 and a CKP (chicken plucker)
That is if you want to QUICKLY get ‘across the street’ it is HARD TO BEAT sq2. For example
h sq2;          - get across the street
rlt; pt; tb;    - get back;
al;             - allemande left (to finish it off)
Or
h prom ½;       - get across the street;
h sq2;          - get back
rlt; pt; tb;     - go across again
rlt; pt; tb;    - go back (again)
al              - allemande left (to finish it off)
Now the sequence above is repetitive but if you know more than one CKP (chicken plucker) you can make it more interesting. Another very useful CKP sequence (worth memorizing) is SQ3; TB; (square thru 3; trade by)
Thus you can fix the previous sequence to be
h prom ½;      - get across the street;
h sq2;         - get back
rlt; pt; tb;    - go across again
sq3; tb;       - go back (again)    (33 beats  to get here)
al             - allemande left (to finish it off)
Which is a perfectly fine singing call figure for beginner dancers (who appreciate slower 33 beat figures)
Finding Zeros and CKP (chicken plucker) sequences
Notice we have ALREADY learned a bunch of ways of getting ‘across the street’. They include
- h prom ½
- sq2 (as well as srt; c pt (star thru centers pass thru which is equivalent to sq2)
- rlt; pt; tb;
- sq3; tb;
Once you know these there is a general strategy to make a patter sequence
- Use promenade ½, sq4 and sq2 to get to a box (either to corner or across the street)
- Do something that does nothing (this is called a zero), this CAN be NO CALLS at all
- Use a CKP sequence (we already know a few) to go across the street
- Repeat steps 2 and 3 as needed until you are back to your corner
- Allemande left, right and left grand, promenade
To do this well we need some Zero sequences, and it would not hurt to have some more CKP sequences as well.
Well if you know some singing call figures (and you should have memorized 6 of them already), you can ‘mine’ them for zeros and CKP sequences. For example take the following example
h sq2; st; br; circ; cdtl; fl; saq;
Which happens to be the SQ2-CDTL-FL figure in Square Dance Figures. Notice it begins with SQ2 (so the rest of the sequence starts across the street), and it ends in a corner box (because the spreadsheet’s ‘End’ column is c-box) which means you are facing your corner. Thus the sequence without the sq2:
st; br; circ; cdtl; fl; saq;
Is a sequence that starts ‘across the street’ and ends facing your corner. But a sequence that does this is a Chicken Plucker (CKP). Thus we have found a NEW CKP sequence ‘hiding’ in our singing call. And we have ALREADY memorized this sequence because it is a good singing call. SCORE
And it gets better. If you stack two CKP sequences together, they go across the street and come back, which is a ZERO. Thus we could turn the sequence above into a ZERO by putting another CKP sequence either in front of it or behind it. For example
rlt; pt; tb; st; br; circ; cdtl; fl; saq;
Is a zero because it is simply two CKP sequences back to back.
So we can find CKP sequences in figures that begin with SQ2. If figures begin with SQ4 (or with prom ½; sq2, which we know does the same thing (across the street and back)), we can find ZEROS. For example another sequence from Square Dance Figures is PROM-RFL
h prom 1/2; h sq2; rlt; vl; btl; rfl; sl;
We see that h prom ½ takes you across the street and sq2 brings you back (just like SQ4). The rest of the sequence ends in a c-box so it must be a ZERO (it starts in a corner box and it ends in a corner box).
The main point here is
- Many singing call figures have zeros and chicken plucker sequences inside them
And thus any singing call figures you already know, can also be used to make zeros and CKP sequences to make interesting patter.
Even the singing call sequences that end in waves or lines facing out can be used, you just have to modify the endings so that they end in a c-box instead. For example many figures that end with lines-out ended with a SQ3 to get there. If instead of SQ3 you do a RLT; SRT; it changes it so that you are facing your corner rather than facing out with your corner. Thus those sequences can be used as well. We have already talked about if a figure ends in gbgb-wave you can add br; rlt; sl; to get to a c-box, so you can convert these sequences to zeros or CKPs as well.
So in short those 4 singing call figures you memorized will come in quite handy in your patter.
Leveraging the ‘ocean wave-facing couples’ rule
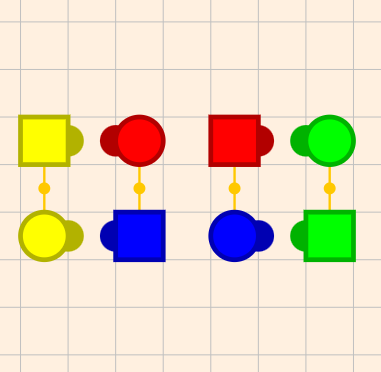
Most of us know the ‘ocean wave-facing couples’ rule that states that things that can be done from waves can be done from facing couples (without calling step to a wave) or vice versa. The intuition behind this is that ‘step to a wave’ requires almost no movement so it is not surprising that the two positions are considered equivalent. We can use this to get even more CKPs and zeros (starting or ending with waves instead of boxes (facing couples)). For example the sequence h-sq2 leads to the left formation below if we then step to a wave we get the formation on the right.
| After a H SQ2 | After H SQ2; Step to a Wave |
|---|---|
 |
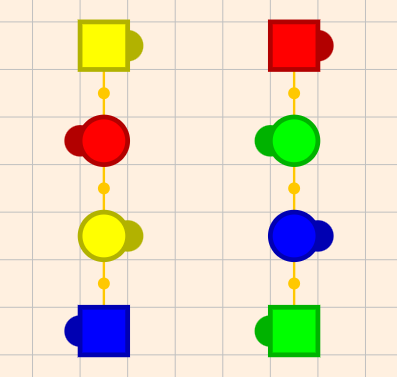 |
So the equivalence of waves and facing couples strongly suggests that the formation on the right is just ocean wave equivalent of being ‘across the street’ (that is being close to your right hand lady).
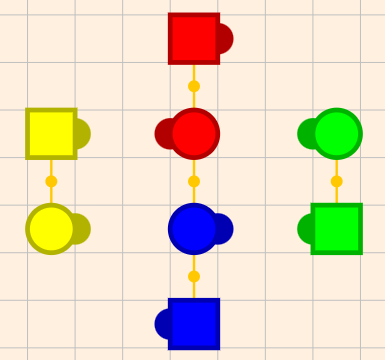
Interestingly we can get to that same ending wave by doing a ‘h-pto’ (heads pass the ocean) followed by extend.
| After H-PTO | After H-PTO; Extend |
|---|---|
 |
|
Notice these are the SAME ending formation. Thus h-pto; ex; is the same as sq2. The only difference is that h-pto; ex; ends in a wave, and sq2 in facing couples (which are equivalent).
We can use this insight to come up with more CKP and SQ4 equivalents
- h pto; ex; is the wave version of SQ2
- h prom ½; h pto; ex; is the wave version of SQ4
Thus we can use these to start off our patter sequences to get even more variety.
Finally it should be noted that the VERY COMMON sequence
rlt; vl; (right and left thru; veer left) is equivalent to
st; br; (swing thru; boys run)
It is just that the first only works from facing couples, and the later will work there as well as waves. Another useful piece of information is that st; br; takes about 3 beats LONGER than rlt; vl;, so this can help you speed up or slow down a singing call figure to make it work optimally for your dancers.
You now have MANY building blocks in which to ‘play’ with patter modules. You know how to get ‘across the street’ MANY different ways, including with ocean waves. You can use PIECES of singing call figures to make zeros and other CKP sequences, and string these together to make interesting patter sequences. Frankly this is enough to do very nice patter (and you never needed to resolve an arbitrary square).
Foolproof resolution - two couple resolution
Using modules and CKP sequences is a GREAT way to call patter, however because you are constantly going ‘across the street’ it is VERY EASY to forget which side of the street you are on (do not underestimate the likelihood of this happening, it happens to EVERYONE). If you can REMEMBER your head couple and that man’s corner, you can always know what side of the street the formation is in by simply looking if the head man is ‘next’ to his corner (in which case he is not across the street) or not (in which case he is). Thus you HAVE to DEVELOP the DISCIPLINE of reminding yourself every few calls where your focus couple and his corner is. If you can do this reliably, you are home free.
But if you are calling modules you also have to remember your ZERO and CKP sequence correctly. Thus there is definitely room for error when you call patter using modules. Once you have made a mistake there is no way of correcting it (unless you know how to resolve).
Sometimes you want something that is more ‘foolproof’. The good news is such a technique exists. The idea is to simplify things so that you only have to remember JUST ONE COUPLE. Because dancers often dress alike you often don’t even have to remember anything (the clothing does it for you). You also only need this one couple ON THE WHOLE FLOOR. Typically this is easy to find (you either know a couple who is dancing together or you can use clothing to match the couple).
The basic idea behind this way of calling is to divide the square in two and never let the two sides of the square interact with each other. Thus you are effectively calling not a 4 couple square but a 2 couple ‘half square’, and there are not that many ways that just two couples can be mixed up. The procedure is as follows
- Locate the 1 couple you want to focus on, let's assume they are a head couple.
-
In that case, have the sides SQ4. This will make two half-squares of 4 people (2 couples) that are facing each other and one of the half-squares has your focus couple in it together as a couple (facing in on the ends). Your square will look like this (the red couple is our focus couple).
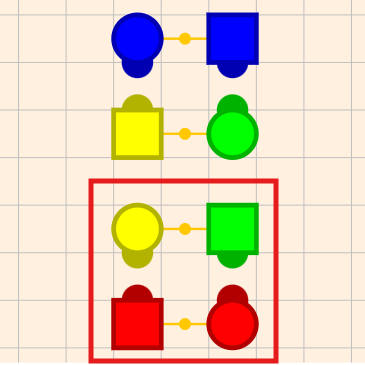
Notice that at this point, everyone is facing their corner so the square is ‘resolved’ (you can call an allemande left). 3. Call ANYTHING you want as long as it does NOT cause the set of 4 people in the half-square (in the red box) to leave that half square. In practice this means no circulates, trade-bys and most bend the lines (there are others illegal moves, but 80% of all calls are OK, just don’t let people ‘escape’ (or enter) the group of 4 you formed) Notice that because you never let any of the dancers ‘escape’ this group of 4 people, it will ALWAYS contain your focus couple. Let’s assume that after calling some calls the square has ended up in the following configuration:
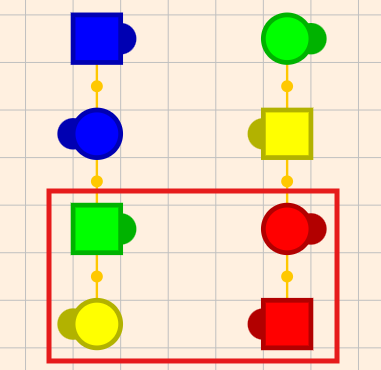
-
Our job is to get that focus couple back on the end facing in (just like it was after the SQ4). If we do this the square IS RESOLVED (because this gets the lower box back EXACTLY like it was after the SQ4, which is resolved, and by the mirror property the other half of the square MUST be like it was after the SQ4 (that is, it is resolved too). Thus ALL WE NEED TO DO TO RESOLVE IS GET our FOCUS couple on the end facing in.
Notice that this technique has a couple nice properties
- You only have to remember one couple (you don’t have to remember a corner because you always keep your corner ‘near’ your focus couple and thus if you can get your focus couple on the ends, you will be resolved).
- You can call A LOT of choreography with just those 4 people. Probably 80% of all mainstream calls can be called with just 4 people (not allowing them to ‘escape’)
So all we need is a technique for going from an arbitrary formation of 4 people, to boxes with the focus couple on the end. We do this in two steps:
- Get to lines facing in.
- Rotate the box as needed to get the focus couple on the end.
Note that step 1 you probably will happen by accident if you just keep calling legal calls. Pretty quickly one of the formations will be lines facing in. However if you want more explicit instructions
- First, avoid sashaying your dancers. This means no girls-run, box the gnat, u-turn-back, or half sashays. Your beginner dancers will thank you.
- If the girls and boys are not facing the same direction, a boy-run is your go-to call to get the girls and boys facing the same direction.
- If everyone is facing out, a partner trade will get them facing in.
- If your group of 4 is in an ocean wave with the boys on each end, the REC; SAQ; (recycle, sweep a quarter) will bring them to lines facing in. (ST; BR; BTL; will work as well). If the boys are in the center of an ocean wave, a BR-BTL will get you to lines.
Once you are at lines facing in (and they are non-sashayed), there are actually very few possibilities. Here are the important ones (the others are mirrors of these). Please notice where our focus couple (the red one) is.
| Couple-beside | Couple-Facing (centers) | Couple-Facing (ends) | |||
|---|---|---|---|---|---|
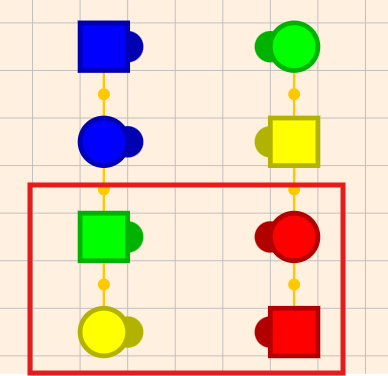 |
FL → | 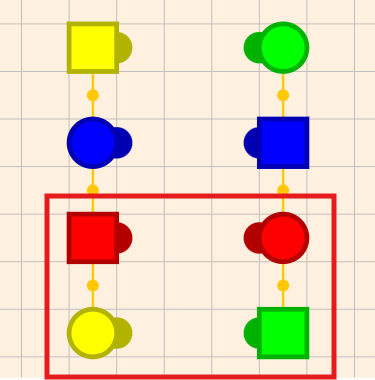 |
RLT → | 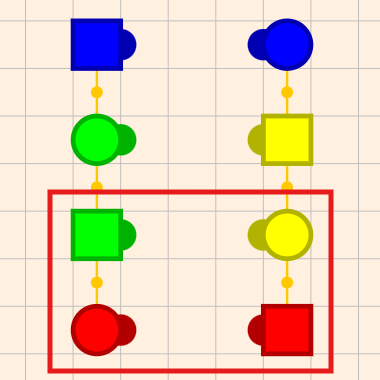 |
SRT → |
Notice that the last possibility (focus couple-facing on the ends) is VERY close to being resolved. All you need to do is a SRT (star thru), and you are resolved. The middle possibility (focus couple-facing at center position) can be converted to the last possibility (focus couple-facing on the ends) with a RLT (right and left thru). So we have techniques for resolving the last two formations.
Thus ALL WE NEED is a way of turning the first possibility (Couple together) into EITHER of the other two possibilities. Turns out FL (flutterwheel) does that. Typically you don’t want to call flutterwheel without some ‘flow’ so you will probably want to do a RLT; FL; This extra RLT will not interfere with our algorithm. RFL (reverse flutterwheel) will also work, but again you want some flow, so doing a PT; PTD; RFL; (pass thru; partner trade; reverse flutterwheel) does the conversion with nice flow. Either of these work (and many more as we will see).
Thus our algorithm is to get the square to lines facing in. Then:
- If the focus couple is beside each other (couple-beside) do a RLT; FL; This will lead the focus couple to be facing each other (either ends or centers).
- If the focus couple is facing in the centers, do a RLT to get the focus couple to the ends (still facing each other).
- Do a SRT to resolve the square. Follow with an allemande left, promenade.
So we now have a complete algorithm
- Pick a focus couple (we assume heads)
- If the focus couple is the heads, call ‘sides SQ4’
- Call ANYTHING that keeps the box of 4 people in one half the square together.
- Get those 4 people to lines facing in (br is often useful)
- If the focus couple is together (in the same line-of-4, facing the same direction), call RLT; FL; to get them facing each other.
- If the focus couple is facing each other in the center, call RLT to get them facing each other on the ends.
- Call SRT;
- Square is resolved, call AL (Allemande Left) PROM HOME.
Couple-beside-to-couple-facing calls
There are other calls besides FL (Flutterwheel) that can get the focus couple from being beside each other to facing each other (step 5). However the MOST COMMON CALLS (e.g. SRT; RLT; SQ3; SQ2; PT; VL; CDTL; PTO; ST; BR; FW; TQ; SB; DT; PTC; PTD; CIRC; TB;) will NOT do this. Only a handful of calls have this couple-beside-to-couple-facing property. Here are the most common calls that have this property. You can see the list is not huge.
- LC (Ladies Chain)
- BTL (Bend the Line)
- WHD (from lines facing out)
- FL; (Flutterwheel)
- RFL; (Reverse Flutterwheel)
- SAQ (Sweep a Quarter)
- C TD (Centers Trade (of a wave or two-faced line))
- REC (Recycle)
- WAD (Walk and Dodge)
- SCIRC (Split Circulate)
Note also these calls move from couple-facing-to-couple-beside AND BACK, so a figure with TWO of these will cancel out (thus ZEROs tend to have an EVEN number of these calls in them (check out the figures in Square Dance Figures and see). In particular if you flutterwheel (or reverse flutterwheel) and call sweep a quarter, the two ‘cancel out’ and you will NOT change the couple-facing-to-couple-beside property. Thus instead of right and left thru; flutterwheel, you could use recycle (e.g. pass the ocean; recycle; star thru) or wheel and deal (e.g. pass thru; wheel and deal; centers pass thru; star thru), to get from couple beside to couples facing in the resolution technique.
Use Taminations Sequencer to Practice Resolution
The taminations sequencer is a GREAT way of practicing resolution. Please see the Taminations section in this document on setting it up well. You can start right away with the foolproof technique and simply practice it (try it now) When you can resolve easily using the default setting you are ready for the next step.
Tip: Use the Sequencer’s ‘color random’ feature to make resolution more realistic.
In the taminations settings there is a ‘Dancer Color’ setting, and one of the options is ‘random’. If you choose this, then each dancer will be given a different color. This mimics real life (where people no longer dress alike so you can tell which person goes with which couple). This makes resolution SIGNIFICANTLY harder. Thus when resolving when couples are color coded is too easy, this is the next step to take. Note that you can simply type ‘color random’ as if it were a call to set this, and ‘color on’ to put it back to its default coloring (you can also go to the settings pane).
Note that the key to mastering random color is to practice the memory techniques mentioned in Memory practice (who’s your corner?) section. It is all about discipline (reminding yourself who your focus couple is at regular intervals, until it is easy).
As you read this section on resolution I STRONGLY recommend that you experiment with the sequencer as you read. As you read a resolution technique, you should do it yourself in the sequencer. Then try variations. When I tell you that certain calls will make the square change in various ways (e.g. couple-facing-to-couple-beside), TRY IT, and see that it works. It is by doing things like that that you really learn.
Expanding on Foolproof Resolution
Note that one of the steps in foolproof resolution is to call ANYTHING that keeps the 4 people together. This includes all ‘two couple’ calls (because no person will leave the group of 4 people after the call), but it ALSO includes sequences that cause people to LEAVE as long as they RETURN by the end of the sequence. These sequences ALL have this property
- You can call a FW; C PT; (Ferris Wheel, centers pass thru)
- You can call a PT; WHD; C PT; (Pass Thru; Wheel and Deal; Centers Pass Thru). This sequence also has the effect of moving from couple-beside to couple-facing.
- ANY ZERO, including ZEROs that are two CKP sequences back-to-back.
Because singing call figures can be mined for ZEROs and CKP sequences (as noted previously) You have already memorized some useful ZEROS and CKP sequences and you can use them here to make your ‘foolproof’ choreography more interesting.
You can also use any of the SQ4 equivalents to ‘get into’ your group of 4 people (e.g SQ2; CKP). Thus you really can make pretty interesting choreography using this ‘foolproof’ technique.
Expanding MORE on foolproof resolution
In the previous section we expanded our choreography out of our group of 4 by adding ANY ZERO we like. However we can expand this even more with a simple technique. Previously we disallowed all moves that moved people out of their group of 4. We relax this to allowing other moves, as long as we use them in sequences that bring the group of 4 together again. For example.
- Trade By if you follow it by a CKP (e.g. sq3 Trade by) OR a Swing Thru, boys run, couples circulate.
- Couples Circulate if you follow it by another couples circulate OR a ferris wheel, centers square thru 3.
- Circulate from Waves if you follow it by another circulate, OR swing thru, boys run, couples circulate.
- Wheel and Deal (from lines facing out), if you follow it by a centers pass thru
- Dive Thru if you follow it by a centers square thru 3
- Ferris Wheel if you follow it by centers pass thru
This is more flexible than the idea of using zeros, because the sequence does not actually have to be a true zero, it just needs to bring the group of 4 people back together. You can often do this with just one or two more calls (as shown above). The list above is not exhaustive, and moreover as you can see you can have more than one way of following any particular call. Typically chunks of singing call figures (that you have already memorized) will work. Thus you can do this for ANY call you like, just make sure that you have confirmed in TAMINATIONS that by the time you finish your sequence the same group of 4 people are together on one side of the square (the formation does not matter).
If your focus couple is REALLY set in your memory (e.g. you know them as a couple, or they are dressed in a way that makes it very obvious they are a couple), then you can extend the technique even further. The idea is that you get your focus MAN partnered with the lady who is NOT his partner (which has to be his corner). You then can call any calls that stay in odd station (see The Joy of Stations, but it is most calls except column circulate and spin chain thru) but you specifically WATCH this MAN and CORNER on EVERY CALL. You can do this by simply keeping them coupled up, but you can also allow them to leave each other as long as you bring them back together at least every few calls. By doing this repeatedly, you force yourself to remember these two people. When the man and his corner are together as a couple, put them on the ends facing in as a couple in a box. If at this point the MAN’s ORIGINAL PARTNER is not in the box of 4, then do a chicken plucker and she should be there. At that point you have reestablished your group of 4, and can resolve using the foolproof resolution technique.
What is wonderful about this technique is that the HARDEST thing to do in resolution is REMEMBER a PARTNERSHIP and a CORNER. But notice this breaks it into two easy pieces. First find a partnership that is easy (by clothing or existing knowledge). Then keep your chosen couple and that man’s corner together in a group of 4 for a bit. When you are ready, break away with the MAN’s corner using a move like couples circulate that breaks the group of 4. At this point only worry about tracking the MAN and his CORNER. You can keep them together as a couple for a while, then let them separate for a call or two before bringing them back together. Keep doing that until it is easy to remember that they are corners. Finally when you need to resolve, get this man-and-corner on the ends facing in as a couple in a box, if needed use a chicken plucker to get the man’s partner in the group of 4, and then resolve as normal for foolproof resolution.
When Patter Breaks
Inevitably, you will forget who your focus couple or corner is, or maybe your pilot square breaks, but the result is that you can no longer resolve the square. You can just tell people to go home, but in most cases that is not optimal. The goal is to keep them dancing and to ‘simulate’ a successful patter. You do this by
- If the break occurred after just a few seconds, just call something until you have had them dancing for 30-60 seconds (a normal length between resolutions).
- If you can find SOME couple on the WHOLE floor (e.g. a couple dressed alike) bring them together. For extra credit get them on the ends in boxes (couples facing each other (like the side couples are after the heads square thru 4)).
- Call an allemande left, and promenade. Tell them to fix it on the promenade.
Typically if many squares crashed during a sequence you don’t want to end on that. Thus pull one of your robust singing call sequences and do a quick patter with that so that you end on success.
Getting Home with a little bit of help from your friends.
For beginner callers, when patter breaks it is best to keep it simple as mentioned above, and simply have them fix it on the promenade (after letting them dance a reasonable time), however, with just a LITTLE help/luck, you can resolve the floor from ‘nothing’.
What you need to start is 1 couple that you can identify. If you know the dancers, you probably know a couple that dances together, and that will do the trick. Otherwise look for people who have dressed alike. Typically you can find at least one such couple on the whole floor.
Next, make your best guess whether you are in even or odd station (explained later), and if you are in odd station get to even station (again explained later). Then get your couple together as a couple in lines. Then ASK THE DANCERS if they are with their partner. Either everyone will say yes (if you are in even station), or only half the dancers will say yes. If only half answer yes, then get to even station (e.g. TQ, CIRC, BR, SL), and get your couple back together and ask again. Now everyone will say yes. Next call TQ, CIRC, BR, SL, which will get you back to odd station where people are either facing their corner or their right hand lady. So ask the dancers if this is their CORNER. If they say yes, do an ALLEMANDE LEFT, if they say no, do a CKP (rlt, pt, tb), and ALLEMANDE LEFT. Thus with typically 2 questions you can fix any floor. You can add a bit of showmanship (like saying, OF COURSE it is, or ‘I was just checking if you knew’, or “who put the corner in the wrong place” …), to turn it into something fun for the dancers. They will actually be happy that they could help you get THEM home.
The Joy of Stations
It is not an understatement that reading the CallerLab document ‘Controlling Choreography With Relationships’ by Barry Johnson, changed my life as a caller. I do recommend reading it at some point in your calling career (including right now if you are eager). If you would rather not, you can get what I think are the most important points by simply continuing to read.
The most important point made in that paper is the concept of a STATION. A Station is PROPERTY of the square as a whole. There are 4 stations
- 0/4 Partner station
- 1/4 Corner station
- 2/4 Opposite station
- 3/4 Right hand lady station
Notice these stations are named for the position of someone else in the square, and I have numbered them by how many ¼ promenades the man needs to move to become that person’s partner. Moreover I will call partner and opposite stations even stations (since they are even numbers) and the right hand lady, and corner stations odd stations.
Stations are a property of HALF A SQUARE (a group of 4 people). Consider the following square after the call ‘sides SQ4’ has been called.
After SIDES SQ4
Notice you can always divide the square in two different ways (either a horizontal or vertical line that cuts the square in two), and the concept of stations works either way, but one way of dividing the square is usually much more useful. In the case above a horizontal line makes more sense because we have VERY FEW moves that keep a vertical line of dancers together but we have MANY calls that keep a box of 4 dancers together. Thus for this case we choose the horizontal line (and we keep that choice fixed for the duration of our analysis). If we had started with a heads SQ4, we would have chosen a vertical line.
Once we have chosen our line that divides the square in two, we have two groups of 4 dancers. Because of the mirror property we can pretty much only deal with ONE of these two groups, because the OTHER group MUST BE THE MIRROR IMAGE of this group. So we focus our attention on just this one group of 4 dancers.
In the example above we say that the square is in corner station, because in this group of 4 everyone is with their corner in that group of 4 dancers. Note that stations are pretty robust, because MOST calls do NOT break up the group of 4 (indeed you need 4 dancers to perform the move), and thus you stay in corner station.
Also note that stations require that ALL people on that group of 4 have the relationship. Notice that the head boy (red) is with his partner in that box of 4, but we do NOT call this partner station because side dancers (green and yellow) are NOT with their partner in this box of 4. Everyone has to have the SAME relationship, and it is actually somewhat surprising (but true) that in EVERY square you have to be in ONE of the stations (there is no ‘none of the above’ or ‘mixed’ station).
Now if we do a CKP sequence (e.g. RLT; PT; TB) we get the following formation
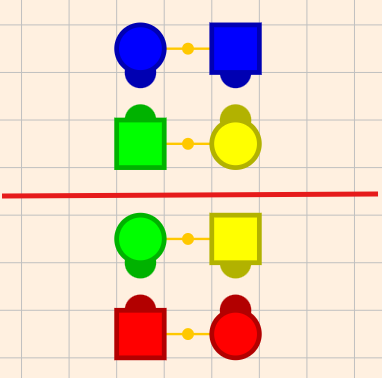
After RLT; PT; TB;
We call this formation right-hand-lady station because now everyone in our group of 4 is with their ‘right hand dancer’ (note that this is true for the girls as well as the boys, we would more correctly call this right-hand-dancer station). Again EVERY dancer is with their right-hand person.
If on the other hand we had started with a square set and called S LR (sides lead right) we would get the following formation.
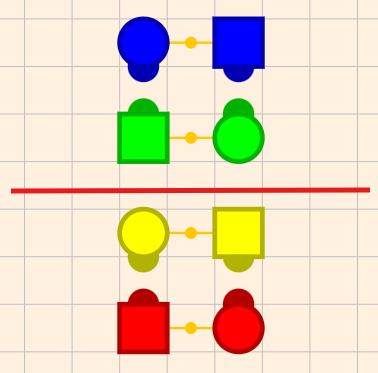
After Sides Lead Right
Notice everyone is with their partner, and so we call this partner station. Finally if we do a FL; CKP (flutterwheel; right and left thru; pass thru; trade by) from this formation we get the following formation:
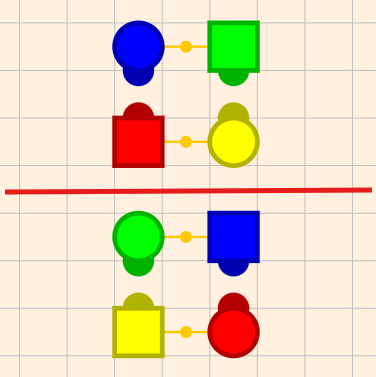
After FL; RLT; PT TB;
In this case everyone is with their opposite. This is hard to see because NO one is with their partner. However if you remember that red’s opposite is blue, and green’s opposite is yellow you can confirm that everyone is with their opposite, so this is opposite station.
These examples also illustrate a couple of important properties:
- In odd stations (corner or right-hand-lady), EXACTLY one couple is together (an odd number) in the group of 4
- In even stations (partner or opposite) either two couples or no couples are together (an even number) in the group of 4
These properties are true in general. Now we see why sometimes when we are in lines everyone is coupled up (even station) or just two of the 4 couples are (odd station).
There is another property that is good to notice
- It is pretty easy to move among odd stations (a CKP will do it), or among even stations (a flutterwheel (or any of the other flutterwheel-like moves change the couple-facing-couple-beside property) and a CKP will do it.
It turns out another really important property is the reverse
- It is hard to move from an even station to an odd station or back.
The reason is that in order to move from an even station to an odd station (or back), you need ONLY 2 dancers to CROSS THE CENTERLINE of the square. Most calls do NOT do this (either they are 2 couple calls (no one crosses the center) or 4 people cross (most circulates). The exceptions at mainstream are
- Circulating from a column
- Asking just half the dancers to circulate (e.g. girls circulate, or ends circulate)
- Spin chain thru
- In a double-pass thru formation, asking JUST THE CENTERS to do a couples-facing-to-couple-beside move. (e.g. centers flutterwheel).
These are ALL RARE. If you were ‘just calling’ you probably would not think to call any of these moves. Thus once you are in even station you will probably stay in even station unless you purposefully do one of the things above.
Beginner callers that don’t understand what we have just discussed can often get ‘stuck’ trying to resolve because they get in opposite station (where no couples seem to be near each other), and they can’t seem to get their focus couple together. The standard advice for callers who can’t seem to get their couple together is to call ACEY-DEUCEY (ends circulate centers trade) which will change you from even station (where you might be in opposite station), to odd station (where there will be a couple together in each group of 4 GUARANTEED)
Tip: When starting out, avoid even stations. When you do a SQ4 or a SQ2 you end in odd station, and so if you don’t call one of the 4 things above, you will stay in odd station. Note that LR (lead right) from a static square will put you in even station, so to follow this tip, either don’t call lead right OR IMMEDIATELY follow it by one of the 4 things above (e.g. lead-right; swing-thru; girls-circ; boys-trade, or lead-right; star-thru; touch-a-quarter; column-circ; boys-run)
Staying in odd station has other benefits:
- In any group of 4 people there is ALWAYS exactly one couple.
- You only have to remember your focus couple and that couple’s corner. (that is, three people). Knowing that you are in odd station allows you to just ‘know’ that the corner’s partner is in the correct place, without having to remember who he (she) is.
- If you bring your focus couple to the ends (like we learned in the foolproof resolution) then you MUST be either next to your corner (in which case you are resolved) OR you are next to your right-hand-lady (not your corner), in which case a CKP will resolve the square.
So all of this suggests the next step in your ability to resolve. Once you have the foolproof resolution technique mastered (which by the way is just saying ‘stay in corner station’). You can move on to the next technique which is ‘stay in odd station’. It works like this.
- Find your focus couple, and REMEMBER that couple’s corner.
- Start your figures so you end up in odd station (e.g. SQ4, or LR followed by something that flips you to odd station).
- Don’t call anything that will change station parity (that is, stay in odd station). This is VERY easy to do (avoid columns and asking half the square to do something).
- When you are ready to resolve, move your focus couple to the end of the line facing in (just like you did in the foolproof resolution technique).
- At this point EITHER your focus couple is next to your REMEMBERED corner, or NOT (in which case it HAS to be the right hand lady (but you did not remember the right hand lady, you just know it was not the corner)).
- If the focus couple is NOT next to the corner, then do a CKP. That WILL bring the corner next to your focus couple and the square is resolved.
It turns out, that step 4 (Bringing your focus couple to the end of line), is a bit harder than it was in ‘foolproof resolution’ That is because in foolproof resolution, the focus couple could not ‘escape’ its group of 4, and thus the couple was already ‘near’ each other. So it is helpful to know techniques to bring two people together as a couple. Here is a technique to do it (there are many others).
- Get to 2 faced lines. (SRT; RLT; VL or ST; BR; are typical ways of getting there)
-
Next, we want our focus couple to be in the SAME LINE. If they are not in the same line we will use a couple’s circulate to fix that, BUT we need to set it up properly. Consider this formation where we are trying to bring the red couple together.
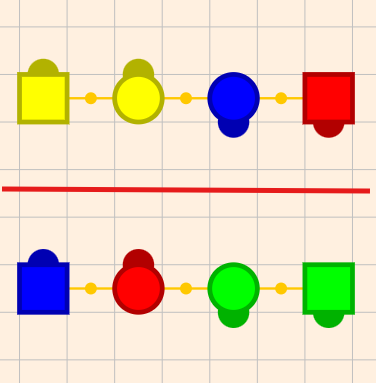
Notice if we circulated from here both red people move to a new line (you can also have the situation where both red people stay in their current line). Thus in this formation circulate will NOT get us what we want (our focus couple in the same line). Fixing this is easy. Simply call girls (or centers) trade. This gives us
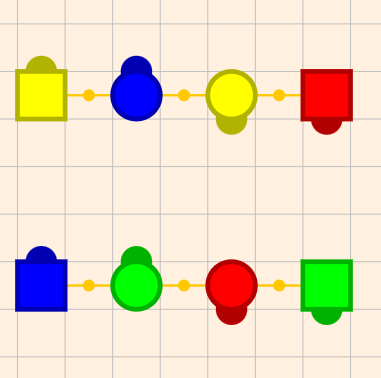
After Girls Trade
And so after a couple’s circulate we now have our red couple in the same line.
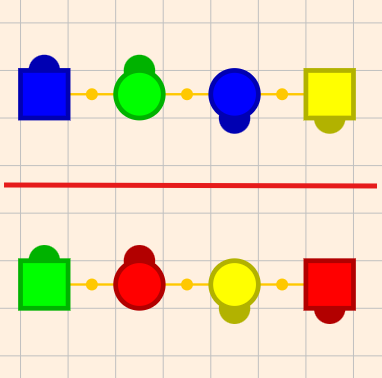
After Couple’s Circ
Once we have our focus couple in the same two-faced line we are actually back to our ‘foolproof resolution’ case. We just need to bring our focus couple to the end of boxes. To get the focus couple-facing each other, we start with a ‘chain down the line’ and then add a flutterwheel as needed (that is if our focus couple is in the line together facing the same direction, in the formation above, the CDTL does this so we need to add a FL to get our focus couple facing each other). This gives us this
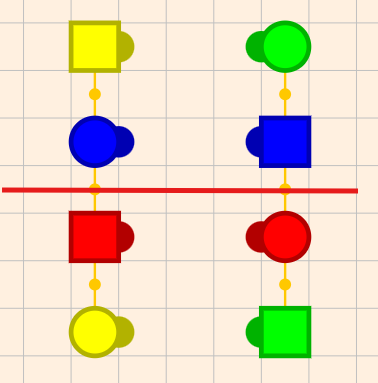
After CDTL; FL;
And following the foolproof resolution technique, we need to do a RLT (to get the focus people on the end) and then a SRT to get them facing in. The result is
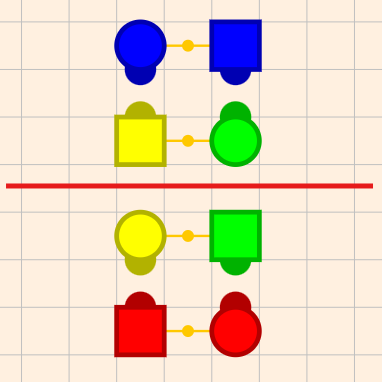
After RLT; SRT;
We remembered our corner (yellow girl) and since she is next to our focus man (red boy), we know we are resolved. If she was not there, we know that we would need to do a CKP (e.g. RLT; PT; TB;) to finish the resolution.
Now get out taminations, and try this yourself after messing up a square.
A Word about the Focus Couple’s Corner
Just now I said that we remembered our focus couple (red) and that couple’s corner, and I said that that was the yellow girl. This is very natural for men because their corner is always a girl. However for women callers, it is likely to be more natural to say that green man is the corner that you remember (after all the red girl is part of the focus couple and the green man is that girl’s corner) You can use either the focus boy’s corner OR the focus girl’s corner in all the techniques described here. You just have to be consistent. Women callers are likely to want to do that (do whatever feels easier for you).
Resolution from Arbitrary Formations
So far, we have made resolution easier by limiting what we call (either staying in corner station, or staying in odd stations). These limits had the advantage that we did not have to remember as much (just a couple, or just a couple and a corner). To do full resolution you have to remember one more thing, but you have a choice.
- You can remember if you are in even or odd station.
- You can remember your corner’s partner (thus 4 people).
Of the two, the first choice is easier, because you only have to remember one bit (yes or no) question (Not a choice among 4 boys), and YOU as the caller have CONTROL over what station you are in. Thus I personally follow (and would recommend) technique 1 along with the following tip
Tip: Any time you change to even station, cross your fingers (or change the hand you hold your mic with). Uncross them when you are back in odd station. This way you are not REMEMBERING anything, your FINGERS are.
Notice you can call ANYTHING you like and you can always resolve knowing only a focus couple and a corner (and if you are in odd station). The way is straightforward. If you are in even station, get out of it (e.g. do a column circulate or an acey deucey). Then resolve as in the ‘stay in odd station’ technique.
If you want to try option 2, the technique is simple enough. Get your focus couple together and get to lines. Either BOTH of your remembered couples (you are remembering 4 people now), are coupled up or only one of them is. If both of them are coupled up, you are in partner station (which is even), so switch to odd, and then resolve as normal (so the only reason you remembered that 4th person is to figure out if you are in even or odd station).
Direct Resolution from Even Station
So far, I had suggested that if you are in even station and want to resolve, you flip to odd station and then resolve. There are also a number of ways of resolving from even station directly. I would only use these once I COMPLETELY mastered resolving from odd station.
To resolve when you know you are in even station
- Get your focus couple together (works just like in odd station) and get to lines facing in.
- At this point ALL the couples in the line are with their partner (you are in partner station).
- Look at your focus man and his corner. They are either ‘next’ to each other (if you joined hands and circle left they would be next to each other) or they are not.
- If they are next to each other call SRT; SQ3
- If they are far away from each other call SRT; PT
That is it! This is so simple that you have to wonder why I suggest resolving from odd station. Why not stay in even station, and resolution is so easy? There are a few reasons.
- Even station includes opposite station, in which NO ONE is coupled up. This is SO disorienting for beginner callers, that it is ‘dangerous’ (I can’t get my focus couple together). Odd station always has a couple near each other, which is very helpful.
- MANY singing call figures are exclusively in odd station. Thus odd station is very ‘familiar’ to both dancers and callers.
- When you resolve from even station directly, you end in a trade-by configuration when you allemande left. Beginner dancers find that disorienting. Odd (corner) station has more options (boxes, waves, lines facing out).
Thus usually callers master odd station and then move on to mastering even station. When you are comfortable with even station, there are some very nice ways of getting you home that dancers like (like ferris wheel, centers sweep a quarter and back out). Typically ‘novel’ ways of getting you home (e.g. last call is leaders cloverleaf, trailers partner trade) involve partner station.
Resolving When the Dancers have had only 1 or 2 Lessons
Early in lessons it may be difficult to resolve a square because you have not taught all the calls you need to resolve. Typically you teach the following calls in the very first lesson
RLT (Right and Left Through); PT (Pass Thru); LC (Ladies Chain); Prom 1/2
During that first lesson resolving is not an issue (you never mess a square up). In the next lesson I teach the following calls
- Star Thru (starts from facing couples).
- Bend the Line (starts from lines (facing in, facing out, two faced)
- Couples Circulate (start from two-faced lines)
- Veer Left (starts from facing couples, makes a two faced line)
- Lead Right (starts from home position, gets to facing couples)
These calls along with the ones from the first lesson (in particular ladies chain) are enough to resolve ANY square. In particular
- LC is like a RFL
- RLT; PT; is like a SQ3
- RLT; VL; CIRC; BTL; RLT; LC; SRT; is a CKP.
- H SRT; C PT; is like a SQ2.
- H PROM ½; H SRT; C PT; is like a SQ4
- H LC; H PROM ½; H LR is like a SQ4
This is enough to do the resolution techniques described previously. You don’t have any way of moving from even to odd station (unless you teach girls circulate from 2-faced lines) but you can use the direct resolution from even station technique so you never need to go from even to odd station.
And of course you can always use ONLY the singing call figures in Early Dances and thus never get the squares messed up in the first place. This might be the best answer. After a couple more lessons, you can resolve the way you normally would, so this problem goes away quickly enough.
Rules for Good Patter
Beginner callers often call very ‘novel’ sequences. They are legal but they often are not ‘good’. The reason comes down to one of three things
- Bad flow. It forces some dancer to have to change direction suddenly
- Bad hand positioning. It forces some dancer to use the same hand twice in an awkward way
- Did not use standard applications. Many calls are only called from certain starting formations (e.g. recycle typically is only called on waves with boys on the ends). These ‘normal’ starting formations are called ‘standard applications’, and when you deviate from them it is called ‘extended applications’ or ‘dance by definition’ (DBD). Some dancers LOVE this more complex choreography, but you should know your audience and avoid extended applications unless the dance was advertised that way. You should always know that you are doing it (never by accident).
Teaching.callerlab.org is your friend
As its name suggests, the web site https://teaching.callerlab.org is meant to help in teaching square dance to new dancers. But it is also a VERY USEFUL RESOURCE for making your patter call better. At this site is a list of all calls, sorted by program (Basic, Mainstream, Plus) and each call has 7 sections associated with each call. You should definitely check it out.
I want to draw your attention in particular to the ‘Analyze’ section for a call. In it, it has ‘good preceding calls’ and ‘good following calls’. This is VERY helpful when you feel like you are in a rut (e.g. always calling boys run after a swing thru). These preceding and following calls will have good flow and hand positioning and are a great resource for developing new GOOD patter.
Call sequences that have bad flow (or bad hand positioning).
You can often spot a new caller simply because they call ‘bad sequences’. Here are some of the ones that I had to stop calling, roughly in priority order
- Centers SQ3 is DANGEROUS. It ends with having just used the right hand, and MANY COMMON CALLs will need that right hand (ST, RLT, TQ, SRT). If you are going to call an Allemande Left, everything is FINE because that call uses a left hand (many figures end this way). It is also OK if you do a no-hands move like slide thru or trade by. So a centers SQ3 is not NECESSARILY bad, but you have to be careful not to call a move that needs the right hand directly afterward. Note that you can always substitute Centers Right and Left Thru; Centers Pass Thru (which ends without hands, so it does not have this problem) for the Centers SQ3. Be careful!
- Star Thru; Veer Left. Beginner callers often do this from lines to get to two faced lines quickly. More experienced callers will simply do SRT; RLT; VL (not equivalent, but does get you to the formation). The problem with Star Thru; Veer Left is that the girls have pretty bad flow. Be nice to them, and stick in the RLT.
- In general Veer Left is dangerous, unless preceded by Right and left thru or Lead Right. The reason is that most preceding moves build up forward momentum (e.g. pass thru) and asking dancers to veer after that is unexpected and ends up being awkward (e.g. pass through, trade by, veer left is bad).
- Right and Left Thru; Allemande Left. While not really bad, the body flow for this is not great (boys are backing up at the end of the RLT), so you will notice that experienced callers don’t do this. Beginner callers do tend to do this because they see the square resolution needs a RLT and they call it. What experienced callers do instead is a Pass to the Center (or DT); Centers SQ3, or, do the RLT, but then do a zero (e.g ST; BR; FW; C PT) before calling the Allemande Left.
There are others but at some point lists of ‘DON’TS’ are too verbose. Instead follow some rules
- Favor the ‘battle tested’ ‘preceding and following’ calls from teaching.callerlab.org. You can’t go wrong with those.
- For any new choreography, walk it yourself (with ghosts) FROM ALL POSITIONS (girls and boys), to confirm flow, and hand positioning.
- WATCH your dancers (especially beginners) when you are using new choreography, and SEE if there is a pattern of difficulty. If there is it is better to GIVE UP (or save it for your DBD dances). DANCERS WANT FLOW. GIVE IT TO THEM. DON’T get attached to choreography. If it does not work, it needs to be fixed or abandoned. There is plenty of good choreography, don’t let bad choreography seep into your calling.
Note that flow ultimately is a matter of degree. Sometimes there are more important issues. For example I have seen some advice that says Head Ladies Chain; Heads Lead Right is bad flow. They suggest Head Ladies Chain Heads Lead Left, as the alternative. I do agree that the lead left version has very nice flow (you just keep going the direction of the courtesy turn), but IN PRACTICE it is hard to get dancers to dance that sequence well (they have to think, and that causes hiccups). On the other hand, Head Ladies Chain; Heads Lead Right is really not that bad. I have danced it from both positions and it feels like a figure 8 (first you go counter-clockwise then clockwise). Dancers are always successful and there are no rapid changes of direction. Thus I think it is fine. I am sure there are those that would disagree with me. My point is that ultimately you want choreography that dancers like, that is ‘easy’ to dance. Let that be your ultimate guiding star. Watch your dancers (especially new dancers), and see if they do the move naturally.
Calls that are ‘dangerous’
The most popular calls at mainstream have the property that they are ‘safe’ in that they keep dancers
- In right hand formations
- In normal (not sashayed) couples
Calls that do not do this are ‘dangerous’ because if you are not CAREFUL, you may stray into illegal sequences (e.g. asking facing boys to do a star thru), or just ‘hard’ sequences (asking facing boys to slide thru). When you are first learning patter, it is probably best to avoid these ‘dangerous’ calls. At least plan ahead and understand their danger.
- Tag the line is remarkably dangerous. Approach with caution. First do NOT do it from right handed waves (this is very awkward for the centers, left handed are fine), or from lines facing in. Right handed two faced lines or lines facing out are OK (because body flow tends to make the dancers pass right shoulders as they should). Next, Tag the line is also likely to create unusual couple relationships (depending on the starting formation, and what you do after the tag, it will sashay couples, or just half the couples, or put boys and girls together as couples). You have to be prepared with an ‘out’ that gets you back to normal couples again.
-
Even swing thru is dangerous from certain waves. There are two kinds of common waves in square dance.
- What you get from pass the ocean or step to a wave (boys on either the centers or ends). bggb or gbbg waves.
- What you get from a touch a quarter (or hinge). (boys are either facing out or facing in). bgbg or gbgb waves
Swing thru is ‘safe’ from the first kind of wave (do it as many times as you like). However it is dangerous from the second kind of wave, because it will put boys and girls together. You have to be prepared for this.
-
Split circulation is dangerous from certain waves. It happens that it is exactly the opposite of swing thru. Split circulate is dangerous in bggb (pass the ocean style) waves and ‘safe’ from bgbg (touch a quarter style) waves.
- Runs work best when the centers are running. It is pretty common for beginner callers to ask the ends of a wave to run. This is legal but dancers are NOT used to it. I avoid it unless my intent is to do challenging choreography.
- Dixie Style will leave you left handed - You probably already knew this. It is the only move in mainstream that ALWAYS leaves you in a left handed formation. Just be prepared with a way to get back to normal lines (BT; Left ST; GR; BTL; FL; is a great out).
- Girls run works best from left handed formation, boys run from right handed formations. Since we mostly do right handed formations, boys run is VERY common.
- Cross runs are dangerous. Cross runs can change the formation from left to right handed, or sashay your couples.
- Folds leave you in unusual formations (often a formation called a Z). Luckily a ‘Star thru’ or ‘Touch a quarter’ tends to fix things.
- SQ3 when the box of 4 is the same gender is harder. In general when you have partnerships that are the same gender (can happen with tag the lines, or swing thru’s from bgbg waves) things are harder, and in particular sq3 is harder (two of the 4 dancers are rotating in an unfamiliar direction). Be careful, and don’t use these configurations on inexperienced dancers. Be intentional.
Note that a bit of danger is also what makes choreography ‘interesting’ so this section is not to say ‘don’t do these things’ but rather ‘approach them with care’ They are sharp knives that can do damage as well as improve your choreography. Don’t call them without a plan.
Useful ‘short sequences’
I have already suggested that you should memorize some singing call figures that are described in Square Dance Figures. I have also mentioned that you can mine these figures for Zero sequences as well as Chicken Plucker (CKP) sequences. But there are also other sequences that may be worth memorizing. This is what the ShortSeq spreadsheet is for. It is just a list of useful sequences of calls, which do interesting things like
- It acts as a Chicken Plucker (CKP) sequence
- It performs what is called an invert and rotate. This is like a zero in that if you could call an allemande left before this you can call it after, but it does turn the square ‘inside out’. It is useful as a fancier zero that makes the choreography more interesting.
- It rotates a box of four dancers a ¼ turn to the left or right
- It is a short Zero (too short to be a Singing call figure)
- It can act as a SQ4, or a SQ2 from a squared set (gets a sequence going)
- It is equivalent to some other common call (like SRT, or RLT).
Take a look and see if they are useful.
CallerBuddy For Playing Music
When you call, you need to play music. Now in theory you can use a standard audio playing program built into your computer/phone to do this, but a program that specializes in playing music for callers offers some advantages.
- It allows you to CHANGE THE TEMPO of music so that it is exactly 126 Beats per minute. As mentioned, even slight changes in tempo can have a significant effect on how fast dancers perceive the dance.
- It allows you to CHANGE THE PITCH of the music so that it fits in your vocal range optimally, which DEFINITELY makes songs easier to sing.
- It will display the lyrics of the music as it plays. As mentioned, ideally you have memorized your singing calls for your important performances, but inevitably at times you will be learning new songs, and it is helpful to have the lyrics handy while doing so.
- It has an auto-repeat feature for patter music (music never ends). Very handy as patter often goes longer than the typical 4-5 min length of patter music.
- It has a helpful timer for your patter (you should keep patter less than 10 min long, 5-8 min is probably ideal), as well as a 5 min timer for breaks between tips.
- It has the singing call progress monitor at the bottom so you can remind yourself which figure you are on in the singing call.
- All your songs are in one place, and you can easily separate your patter and singing calls (so you can find them quickly).
- It remembers all the changes to tempo, pitch, auto-repeat, lyric tweaks, and other preferences you set so that your music is always optimal.
There are a number of song players for square dance callers including SqView, but the one I want to suggest here is called CallerBuddy. If you type ‘CallerBuddy’ into a search engine you should find the following link:
CallerBuddy — Square Dance Caller Music & Lyrics
Here are some of the features that distinguish it from SqView and the others:
- It is absolutely FREE, it even comes with a FREE demo patter and singing call.
- Setup is trivial, if you click the link above you are running CallerBuddy in the browser.
- Works on Windows, macOS, Chromebooks, Android phones (sorry no iPhone or iPad).
- Works offline so you can play music without network access (even in the browser)
- Music can be in the cloud, safe and available anywhere, but available offline.
- Tracks what music you have used recently, so you don’t repeat yourself.
- Adding songs is trivial (point it at the ZIP you bought, 90% of the work is done).
These features may not seem like a big deal to you, but you don’t realize the pain you are avoiding (especially when adding songs, and worrying about backup). I used to have a section on SqView in this document, and it was 25 pages long! It was not trivial to set up and load with songs. CallerBuddy removes most of this friction (along with letting you use both a laptop and a phone WITHOUT having multiple copies of your library of songs).
Try out the Free CallerBuddy Patter and Singing Call
Just click on the CallerBuddy link to get started. It will run CallerBuddy in the browser and lead you through creating a CallerBuddySongs folder (your library of songs). Note that you are NOT trusting CallerBuddy any more than any other web page on the internet, so it is ‘safe’ to just experiment with (it can ONLY access files in the new CallerBuddySongs folder you create for it).
During setup it will ask you if you want two demo songs. Say ‘yes’ and you can play with them and experiment with the user interface. The app has reasonably good help and hopefully the user interface is intuitive so you can learn most things simply by playing with it.
Eventually you will probably want to install CallerBuddy as an App so you can launch it from the TaskBar (you can find it easily). Note that this does NOT give CallerBuddy any more permissions than it had in the browser, it just makes it easier to find and launch. See the ‘Help Installing as App’ under the ☰ menu for exactly how to do this.
Buying and installing new Music into CallerBuddy
One of the BIG advantages of CallerBuddy over other music players is that it simplifies adding songs to your library of square dance music/lyrics. Generally the workflow for getting a song is to
- Use a site like music for callers to find songs you are interested in. These sites are ‘aggregators’ that don’t sell you music, they point you to sites that actually sell the music. For example you can enter ‘boogie shoes’ to find that music.
- You are sent to a particular web site that actually produces and sells music. You can browse what they have, listen to samples, add songs to your cart and purchase them.
- The result of (2) is one or more ZIP files (one for each song you bought). Now you have to load these into your song player.
Before CallerBuddy (3) was surprisingly difficult because there is no standardization on how music files and lyric files are named and distributed. This was aggravated by SqView’s overly complex mechanism of ‘Marrying’ a song and its lyrics. The result was quite a bit of frustration. In CallerBuddy this has been replaced by two simple steps
- Choose the ☰ -> Import Song from Zip menu item.
- Use the file chooser to point it to the Zip file with your purchased song. CallerBuddy will do its best to figure out what naming conventions were used and convert to the form that CallerBuddy uses. It displays its suggestion and asks you to confirm it.
- You look it over (typically it is perfect), modify anything you don’t like and commit.
This process takes less than 30 seconds, and you are ready to play. Check out the ☰ -> Help Adding Songs for more details on the process.
No Experience Necessary Dances
It is likely at some point you will need to call a ‘No Experience Necessary Dance’. At this dance you assume that the dancers know NOTHING, and you teach them everything they need on the spot. Typically they are 2 hours. Calling these dances is really quite different than normal dances, however it is almost EXACTLY what you do at a ‘first square dance lesson’. The good news is that the choreography at these dances is VERY simple (typically you only teach them ‘circle moves’ (No lines of any kind)). There is no interesting resolution, so if you have not mastered that, it does not matter. However some things are significantly harder
- You need to have a VERY CLEAR idea what you are going to teach and in what order. You want to ‘keep things moving’ which means you always have to know what you are going to teach next.
- You have to WATCH your squares carefully and ADAPT your calling to the dancers (slowing down as needed). Do NOT get hung up on finishing figures ‘on time with the music’.
- You want to PRAISE the dancers when they succeed, and NEVER LET FRUSTRATION come into your voice on the mic. PATIENCE, REASSURANCE and ENTHUSIASM are the only emotions the dancers should see from you.
The order of things
-
Get them into squares. This works better with angels. Ask your angels to find a newcomer and get into a square. They will take it from there. If you have even one square formed, you can point to it and ask the rest to replicate it. If you have no angels, then tell people to couple up, boy on the left, girl on the right, and find three other couples to face (they will form some sort of a circle/square and you can tell them to line up with the walls of the building). The hardest part of this is when you have many single people, in which case people will mill around, hesitant to couple-up. Ask them to raise their hand if they need a partner. If you have a gender imbalance, you can point out that anyone can fill either role, but warn them that the roles ARE different and you should probably STICK with one role the whole dance. Ideally if girls need to dance as a boy, you get angels to do that.
-
Teach partner and corner, and squared set and home. Next, tell them about their partner (the person next to them they are holding hands with), and corner (the person on the other side). Ask them to introduce themselves, and to remember these people. Teach them heads and sides, have the heads (sides) come into the middle.
-
Teach them hand-holds. Boys reach out to partner palm UP, girls reach out palm DOWN. All hand holds are OPEN (you are not grasping, just touching cupped palms).
Tip: while Dosado is traditionally one of the very first calls taught, I DO NOT use Dosado in my no-experience-necessary dances. The reason is that it is an AWKWARD move (you back up back to back) and it has VARIATIONS (angels will be tempted to do a swing or a highland fling instead). It also does NOT set you up for an Allemande Left (technically at the end of the dosado, you are facing your partner not your corner). For all these reasons I use TURN YOUR PARTNER BY THE RIGHT, instead of dosado in early choreography.
Tip: Minimize the use of LEFT and RIGHT in any explanations. MOST people, including myself, can’t effortlessly point left or right on command (they have to think about it), INSTEAD when a RIGHT hand is needed say SHAKE (most people will EFFORTLESSLY reach with the right hand when asked to shake hands). Avoid talking about LEFT. The only time you will be tempted is when explaining Allemande Left. INSTEAD tell EVERYONE that you face AWAY from your partner, and that BOYS reach out with the hand closest to their CORNER, and GIRLS reach ACROSS with the hand they were holding their partner with (notice I never mentioned left). (We don’t teach star thru in no-experience-necessary dances, but again I teach it by saying EVERYONE reaches out with the hand they were holding their partner with, again no need to talk about left or right).
Tip: Teach pass thru (or any no-hands move) by teaching pull by (the handed version of the call) first. When I learned pass-thru they said to ‘pass right shoulders’ which is correct, but has never been helpful to me in the moment (because LEFT and RIGHT are not instinctive). So teach pass thru as a ‘pull by without hands’ (and in a pull by you reach out with your SHAKING hand). Notice this explains pass-thru without ever using the word ‘right’ or ‘left’.
Tip: have the music on whenever you are not talking. This is a dance, and it is SIGNIFICANTLY more fun if the music is on, then when it is off, so have it on unless you are explaining something. If the dancers are moving, the music should be on.
- Teach them ‘turn your partner by the right, allemande left’, Face your partner, SHAKE hands, walk around them holding hands, reach out with opposite hand to your corner turn them with the other hand (which is an Allemande left). Repeat it, and square set.
Tip: Teach them ‘default’ actions. When in doubt, WALK FORWARD and ALTERNATE hands.
-
Teach them promenade. After an Allemande left, reach out to your partner and SHAKE their hand (right hand). WITHOUT letting go girls turn around to face the same direction as the boys, and hold left hands UNDER the right. Walk around the square until you get home (where you started).
-
Teach them right and left grand.
- Teach them circle left. Up to this point you have always told them to face their partner and turn them by the right (shaking hands). Now teach them that you might start with just ‘Allemande left’, but that is ALWAYS with your corner (away from your partner), and hopefully they get the correct hand by the muscle memory you have already built up.
- Teach them boys star right. I find it is easier to teach them heads-sides, and ask the heads boys to step FORWARD and touch INSIDE hands. Then ask the side boys to join them. Emphasize that you just walk forward and form a star with the inside hand. (Don’t teach them star left, you will confuse them and you don’t need it). Turn star to your corner allemande left.
- Teach them girls star left. Use the same procedure, having just the heads step forward using INSIDE hands, sides join them, turn star to your partner, turn partner right allemande left, RLG, Prom.
- Do a SHORT singing call (explaining what it is) (maybe only two or three RING figures, (e.g. one CIR-L, AL, TPR, AL, RLG, PROM, one B-STAR-R, AL, RLG, PROM, one G-STAR-L, TPR, AL, RLG, PROM). BE CAREFUL NOT CALL SWING. Cut the music off when you are done (early).
- Teach them about BREAKS. Take a break.
- Review everything on the next tip. then
- Teach them heads (sides) right and left thru. Teach them pull by (SHAKE HANDS, pull by). Then explain that you want them to turn around AS A COUPLE by having the boys back up and the girls go forward in a SMALL half-circle (don’t worry about hands). Do that a couple of times SLOWLY. When they have the gross body motion right, get the hands involved. After pulling by BOTH people should be reaching out with their left hand (like a right and left grand), touch hands (boy palm up, girl palm down) girls place OTHER hands behind your back, boys, touch your free (right) hand to the hand she has behind her back. Boys back up, girl move forward as before. Tell them that a right and left thru is a pull by and a courtesy turn (each of which are real moves).
- Teach them heads (sides) promenade ½. Explain that the sides have to get out of the way. Do H-PROM ½; H RLT; S-PROM ½; S RLT; Face corner, AL, RLG, PROM. This is a Singing call figure! It has extra time (beginners usually need it)
- Teach them all into the middle with a cowboy yell. (This is useful if you have extra time, it is also fun).
You now have enough to do a full singing call. Note that you use Right and LEFT GRAND not WEAVE the RING, you do NOT SWING your corner (you Allemande Left your corner and PROMENADE (not swing) your original partner. You use the figure in step 14 for all 4 figures (no progression, which is OK) You can alternate heads and sides, and you can alternate whether you RLT then Prom 1/2 , or Prom ½ and then RLT. You use one of the Ring figures from step 10 for the opener, break and closer. You can also use any of the RING figures for ANY of the 7 parts of a singing call (not just opener, break, closer). It would be good to review all the advice on fixing broken singing calls given before, it is ESPECIALLY likely on these first tips with raw beginners.
Note that for BEGINNERS, REPETITION is a GOOD THING. Thus using the SAME figure in a singing call is GOOD. It gives them more practice, and makes them feel successful.
Adding a Bit more Choreographic Complexity
After getting the first singing call down, the rest is just adding moves and using them. These are the ones that people typically use, and they can go in any order.
- Ladies Chain (heads, sides, all 4). You have already taught courtesy turn, so a ladies chain is a girl reach out with shaking hand, pull by, BOYS SLIDE into partner’s position and reach out with LEFT HAND (BOYS if you SLIDE, the hand you reach out with is the obvious one (the other one is now far away and awkward to use)). Finish off the courtesy turn as before (boys back up). Note it feels like a ¾ turn.
- Ladies Center, men sashay. Note that doing this more than twice, feels repetitive, even for beginners, so normally you do a 4 ladies chain, circle left, and then do a ladies in men sashay twice, AL, RLG. If you FORGET to do the 4 ladies chain, you can FIX it by telling them to AL (THIS CORNER (because it is NOT the corner they started with), RLG, BUT ON THE 3RD HAND promenade your partner home).
The sequence
- 4 ladies chain across;
- 4 ladies chain back home;
- Face corner, AL, RLG, PROM
Is another ‘short’ figure you can use.
The sequence
4 LC, CIRC-L, L-IN-M-SASH, L-IN-M-SASH, AL, RLG, PROM
Is a ‘Standard’ ring figure (which can be used anywhere you like in your singing calls.
At this point it is useful to teach them
- Weave the Ring. Note that I tell them that the definition is that it is a no-hands move, but beginners sometimes have trouble. So I always just tell them to ‘tap hands’ on the way by so that it feels like a right and left grand. I mostly teach this because I accidentally call this during singing calls.
- Swing. I only teach this if things are going well. It is handy because I will accidentally call this when I am performing a singing call (too much muscle memory). If I don’t teach it I will warn them to IGNORE it if I happen to say it. If I do teach it I tell them that it is OPTIONAL and in particular if you are CATCHING UP, you should SKIP IT. To teach it, have the boys face promenade direction and the girls face the boys (this is where you are right after a weave the ring). BOTH people hold out the arm that points to the center of the square (thus boys left girls right). The boy’s other hand goes under the girl’s arm and supports her back at the shoulder blade. The girl’s other hand rests on the boy’s shoulder. Boy and girl should be OFFSET, right hips should be close. A swing is a full turn walking around each other in a very small circle. If you are OFFSET this should be EASY. After you master the walking round once, you can try it again leaning out SLIGHTLY (boy has to support the girls back to avoid losing balance). To finish the swing you either
- ‘Girls Flop out’ - let go of hands that were pointing toward center and ‘open up’ until the girls are facing the same direction as the boys. Start promenading (you have to change hands).
- ‘Twirl out’. - While the boys walk forward, raise the inside hand to form an arch which the girl walks through in a tight circle (feels like a spin), until the girl is facing the same direction as the boy. Let Go. Again change hands to promenade position
It is up to the girl which one of these happens. The first is easier (good for beginners) and has less spinning (a swing and a twirl requires 2 revolutions for the girl). However the twirl out, lets the girl keep moving forward, where the ‘flop out’ requires a change in direction. Twirls also look better. Again the girl decides.
There is almost always a promenade after a swing. After mastering a swing ‘in place’ you will want to be able to do the swing WHILE ALSO MOVING FORWARD. This allows you to get home faster (and not be in the way of the couple behind you). Instead of a tight circle you take bigger steps, going around the square as you move around your partner. This is where you will want to be eventually.
- Grand Square. I used to think this was too hard for a no-experience-necessary dance, but experience has proven otherwise, and beginners REALLY get excited about it. I have seen it taught with just half the square and then combined. I don’t think this is necessary (and slows things down a lot). The key to helping dancers is to tell them
- During this move you will ONLY look at your partner, OR your Opposite (NO ONE ELSE).
- Every time you turn you go from ONE to the OTHER.
- In particular you NEVER look OUT of the square (since you need to look at your partner or your opposite).
- In each part, you take three steps and then TURN (to either your opposite or partner).
- If you start out close to someone (you would run them over), you BACK UP, otherwise your steps are FORWARD.
It is very useful if the caller calls 1, 2, 3, TURN for the first three parts, then 1, 2 3, DON’T TURN, at the mid point. Practice it WITHOUT music so you can go SLOWLY, and do it once SLOWLY before doing it to music. The first time you do it to music SLOW the music down (e.g. 124 BPM), and pick music with a good beat. Encourage everyone to clap on the turns, which keeps people doing it together.
This is more than enough to fill 2 hours. You will probably only need 4 singing calls. The rest of the time is explanation and practice.
Other Teaching Advice
Note that from an instructor’s point of view there is no difference between a ‘first lesson’ and a ‘no experience dance’. The first lesson is the hardest (they know the least). The only other big thing with lessons is knowing how to resolve when the students know very few calls. That is covered in the section on resolution. There is also the question of teaching order for the calls. I ultimately chose my own, based on how common/important they were, but both the Callerlab list for basic/mainstream and SSD are fine. I have used the SSD Teaching Guide, and I like it (it gives a lot of material that lets you call dances when they know very little). My main deviation from that SSD teaches wheel around EARLY and uses pass-thru-wheel-around, instead of right-and-left-thru. I have always found that pointless (you are teaching your students low priority things (wheel around), specifically to avoid teaching something important (right-and-left thru). I think they do this because they think it is easier, but given that they DO teach ladies chain early (even harder), I think they can handle right-and-left-thru. I solve this by teaching right-and-left thru in two steps, (first just the motions, which is a pull by and a wheel around), and then add the hands), but I CALL it right-and-left thru from the start. My main piece of advice is don’t be afraid to change the teaching order. Teach the things that will ‘unblock’ the choreography you WANT to call first.
Advanced Things
Up until now I have been covering things that I believe every caller should know. From here on, I will be discussing things that you may never use as a caller, but I thought they were pretty cool, so I am sharing them with you.
Making Resolution more Diverse
Up until now, all patter sequences end in an allemande left, a right and left grand and a promenade. While this pattern is very reassuring to beginner dancers, in general a caller is looking to eliminate ‘ruts’ where certain sequences are called over and over.
Make promenades unambiguous
- Good calling is UNAMBIGUOUS. When you call ‘promenade’ when the couples are near home, you have made it ambiguous: Should they stop immediately or should they go all the way around? Ambiguity is BAD, so never let this happen. If you are near home when you call an allemande left, either
- Simply call ‘square your sets with a clap clap clap’
-
call a right and left grand (which takes you half way around), so that the promenade is half way (and unambiguous).
If you are halfway around when you call an allemande left either
-
Just call promenade home OR
- Just call right and left grand but tell them to square their sets.
Notice in all cases, things are unambiguous.
Eliminating the Allemande Left
- If you are at a corner box and ready to call ‘allemande left’, you can call the following sequence
Right and left Thru; Half Sashay; Pass thru; (to a right and left grand)
Instead of the allemande left. Note that this sequence can confuse beginner dancers so walk it slowly the first time if there are beginners on the floor.
- Now that single circle is a mainstream move, the following move can work when you are at a corner box
Single circle; Pass thru; (to a right and left grand)
Allemande Left from a Left Handed Wave
A pretty cool way of getting out of a left handed wave (e.g. after a dixie style to an ocean wave) is to call an ‘allemande left’ (since centers and ends are already holding left hands). However for this to work you need to be in a ‘left handed corner wave’, that is your square needs to look like this
| Left handed corner wave | corner box |
|---|---|
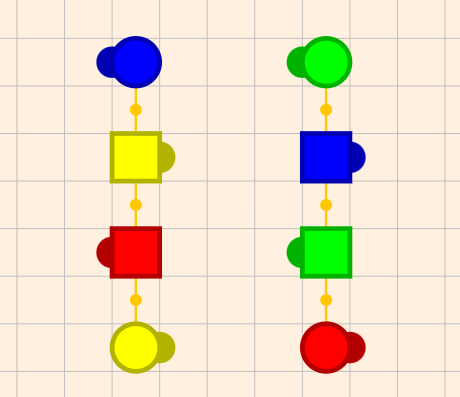 |
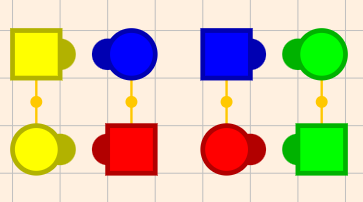 |
Notice that the left handed corner wave (on the left) looks like a corner box AFTER everyone stepped to a left handed wave (so ends and centers are holding left hands). You can get to this position from a corner box by the following sequence
Slide thru; right and left thru; dixie style; boys trade
Thus you can simply add this to any corner box resolution to make your allemande left a bit more interesting (dancers will be surprised by it, but they tend to do the right thing so they are successful, and thus like it).
Resolution by having the centers sweep a quarter.
There are some very nice resolutions that after a wheel and deal or a ferris wheel, you have the couple in the center sweep a quarter and back out to their home. This is a very nice resolution which dancers do like.
The resolutions up until now always had the potential of ‘promenade home’ at the end of them. This was nice because it meant you did not need to get your focus couple to their home, you just needed them near their corner. The resolutions described in this section are harder because
- You must resolve directly from a partner station (which is not as common)
- You must land couples exactly at home (no promenade to save you).
In the explanations below it is assumed that your focus couple is the #1 head (red) couple. Hopefully it is obvious that it will work for a side focus couple by swapping all the references to heads and sides.
- Get to partner station with all couples partnered up in lines facing in. Your #1 couple needs to be in the upper right quadrant facing in like this.
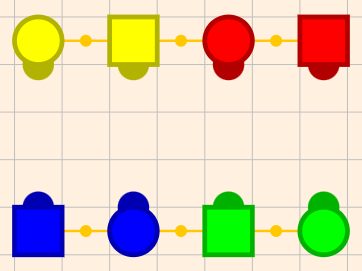
#1 (red) couple in upper right quadrant
Note that at this point it does not matter which couple is facing your #1 couple. The goal of getting here is so that a wheel and deal, will land your #1 couple at home.
- IF your head couple is FACING the #4 couple (that is the #1 man is facing his corner), then you can do a pass thru; wheel and deal centers sweep a quarter; and you are resolved (say square your sets with a clap clap clap to let the dancers know this).
- If not, call pass thru; wheel and deal. Your square will look like this.
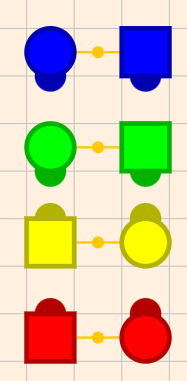
After pt; whd;
- Call centers pass thru; Notice your #1 man is NOT facing his corner at this point
- Call the following
Right and left thru; veer left; ferris wheel; centers sweep a quarter;
This is relatively easy to remember because it is the standard ferris wheel zero (rlt; vl; fw; c pt), where the last part (centers pass thru) is replaced with sweep a quarter - The square is resolved.
Note that if you notice that after the sweep a quarter your sides are swapped, you can of course simply do a sides right and left thru, but you can also do a ‘sides square thru two; allemande left’ which does not look as much like you are correcting a mistake.
Getting your #1 couple to the upper right quadrant.
The first step of the above technique is to get your #1 couple to the upper right quadrant of the square. It is tempting to do this with bend the line calls, but this often results in bad flow (the flow from a bend the line when the lines are facing in is almost always bad). Instead it is better to move your #1 couple to the correct side using Chicken Pluckers or Circulates, and then once there use a right and left thru to get the #1 couple facing the correct quadrant. To do this you will want to use couple-beside-to-couple-facing calls to get your couple from lines facing in to couples facing side walls then use circulates or pt; tb; to move the couples around. Chain down the line; flutterwheel, is also a very nice way of getting a couple turned by 90 degrees.
Finally note to get your #1 couple facing the right way, the lines facing in have to go left or right (the LINES go to the SIDEs, even if the PEOPLE are facing the head walls). Note that 2 faced lines and WAVES, which have their LONG dimension on HEAD walls, are associated with LINES facing in or out, or with BOXES that have their long dimension on SIDE walls. Thus when I talk about wanting a square oriented side to side (long dimension toward side wall or LINES facing in facing head walls), it will often involve WAVES and 2-Faced lines which have their long dimension toward head walls. Thus I do not think of the call ‘pass the ocean’ changing the ‘orientation’ of the square. There are relatively few calls that do, and they include
- Wheel and Deal (very common)
- Bend the line from lines facing in.
- First Couple go Left Second Right
- Cloverleaf
- Tag the Line (sometimes)
- Circle to a Line
- Centers Split 2 around 1 to a Line
- Separate around 1 to a Line
Placing your secondary couple home first
The instructions above assume you ‘place’ your #1 (focus) couple first, and then arrange your secondary couple (the focus man’s corner and his partner) to sweep a quarter home. Sometimes it is more convenient to place the secondary couple first (because the square is already oriented that way, or the couple is closer to its home). You can do this, but the instructions change slightly. Obviously if you are trying to get your #4 couple placed home, you need that couple to start out in the lower right quadrant facing the side walls. However now the ‘Wheel and deal case’ happens when the secondary man is NOT facing his corner. I don’t generally recommend learning to do this until you have MASTERED the technique using the #1 couple and have it down REALLY well. Otherwise you will easily confuse yourself.
Progressive Squares
Progressive squares is the name for the technique where you have adjacent squares exchange dancers. What makes it cool, is that dancers are dancing with a LARGE number of new people and if the caller can get everyone back with their original people (either back where they started, or at some other point on the floor), it is VERY impressive. Check out
Progressive Squares YouTube Video
Now I understood the basics of how this worked. I knew that if you exchange dancers with another square, perform a zero, and then exchange them back this would obviously work. But it definitely is fragile. If at any point you mess up your zero, you are in deep trouble and this made me leery of calling progressive squares. However I had an epiphany, when I realized I could SIGHT CALL progressive squares WITHOUT having to remember more than the standard information (a couple, the man’s corner, and whether you are even or odd station). This makes progressive squares ROBUST (I can use zero modules, but if I mess them up, I can still get everyone back). This technique is what I want to share with you now.
First the Ground Rules
There are a few different ways of exchanging people across squares, but one of the more common is to have lines facing out and these lines end up facing couples from the adjacent square. When you are in this position you define the new call, move on, to mean anyone facing people in another square will pass through, and those who are not facing another square (the edges), will do a partner trade. This is basically a ‘trade by’ but for the whole floor instead of a single square. Dancers are used to this and typically get it right.
Progressive squares need the squares to be set up on a GRID. Thus some organization might be needed before you actually start the tip to get the squares aligned. It is nice if the number of squares is a RECTANGLE (e.g. 6 squares on a 3 x 2 grid) but it is STILL possible to do progressive squares with JAGGED grid of squares (e.g. 5 squares in arranged as a row of 3 and a row of 2), but you have some limitations that I will mention later.
Progressive squares with ‘move on’ don’t really work well with singing calls. There are two reasons for this
- When you exchange couples with another square, you end up with a square that has two heads and two sides, however both heads want position 1 and both sides want position 2. Thus you can never ask them to promenade home because people will conflict about where home is.
- The ladies are progressing to their corner on the 4 figures in a singing call, which interacts badly with progressing lines between squares.
The way they fix this in the YouTube video above is that they have the line leave the square and COME BACK WITHIN each figure. Thus as far as the singing call is concerned, no progression happened. This obviously works, but dancers barely interact with dancers in the other square before it is time to go back to their original square and complete the swing and promenade.
So here we are just going to talk about PATTER. There is an interesting progressive square technique that works for singing calls (with ladies progression), but it does not feature move on.
The Technique
The key to my epiphany was, you guessed it, stations. Consider the configuration of the square after calling SQ4 and SRT from a home square.
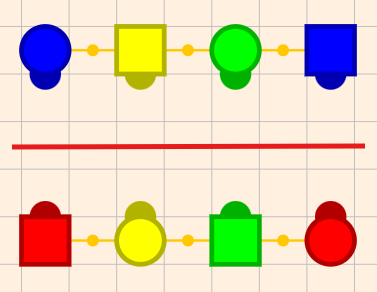
After SQ4; SRT
For stations, we get to divide the square in two however we like and we often choose boxes, but because it is LINES that move across the squares it is useful to divide the square into two lines.
Notice that we ARE in corner station (in each half of the square everyone is with their corner). In particular the bottom half has our focus couple (the red couple), as well as that man’s corner (the yellow girl). Notice that these are the people WE NORMALLY TRACK to resolve a square (we also remember if we are in even or odd station, we know currently we are in odd station (because we are in corner station). I am going to call this kind of line a CORNER LINE (it is a line and we are in CORNER station).
When we do a pass thru, move on, notice that this CORNER LINE moves TOGETHER to the new square. If we STAY in odd station, then all we need to do is make sure that a line with these SAME people moves back together. If what we did was a zero, this would be true, but ALL we need is for the same people to go back together. For example consider the following formation
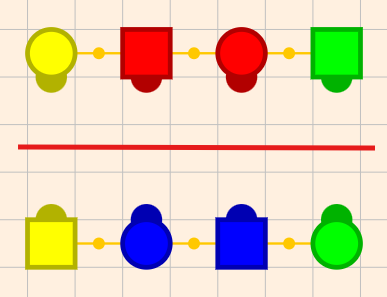
Notice that this is also corner station and if we did a pass thru; move on; the same 4 people would go back to the square they came from. Once these people are back in their original square, you can resolve the square as you would normally do.
The KEY POINT, is that YOU ONLY TRACK THREE PEOPLE ON THE ENTIRE FLOOR (just like for a single square). To keep things simple let us assume you have a RECTANGLE of squares (all rows of squares are the same length) So the basic strategy is as follows
- Get to a ‘corner line’ where all three of the people you track are in a line facing in.
- Move them to another square with a pass thru; move on;
- ONLY allow this group of 4 people to move between squares. (you can do this by making sure that you are in ODD station, and your group of 3 are in the line). You can move to the square above or below, left or right, just make sure they go TOGETHER. Do NOT let your Focus group bounce off the edges of the rectangle of squares (that is when you call ‘move on’ your focus group is ALWAYS moving to a new square).
- When you want to resolve, just retrace your steps of 3 people back to their original square.
- Then resolve as normal.
So the only additional piece of information you need is the ORIGINAL square of your FOCUS couple (and corner). This technique is VERY similar to what is advocated in the ‘station’ paper ‘Controlling Choreography With Relationships’. There they recommend that you get into a station (say corner station), and STAY there for the rest of the patter. In their scheme you can move around, but always with your station person (e.g. corner for corner station). In progressive squares we are keeping the WHOLE group of 4 together and moving around the squares in a similar way.
Note that the reason for the ‘no bounce’ rule in step 3, and the ‘retrace your steps’ rule in step 4 is to keep bookkeeping to a minimum. The issue is that dancers that do the partner trade (I call it bouncing off a wall) change direction, while those who do the ‘pass thru’ part do not. This means that the ‘other half’ of the square associated with your line is NOT always exactly the opposite of your focus line (in fact it usually ‘chases’ the other line). Because of this, getting your focus line back to the original square (say in a small loop around the floor), will NOT guarantee that the other half of the square will make it back too. The easiest way to ensure that both halves of the square make it back is to RETRACE YOUR STEPS. This ALWAYS works because for each half, the ‘way back’ always exactly balances the ‘way out’, regardless of the path. We will relax this requirement later, but for now we keep things simple.
Thus I recommend a very simple path to start: say over 1 up one then reverse and bring them back.
Implementing the Technique
To implement the technique given above, you need to be able to get back to corner lines (or partner lines if you use those), at will, with the lines FACING the direction you want. This is not something you had to do before to resolve, so it is something that needs to be broken down into simpler pieces. We assume you are in the correct station you need for transition (odd if you use corner lines, even if you are using partner lines). We get ready for transition in three steps.
- Get the lines (facing in) oriented the way you want it
- Get your focus GIRLS in the same line using a SRT; CKP; SRT;(star thru, chicken plucker; star thru) if needed
- Get your focus BOY in the same line as the GIRLS using any couple-facing-couple-beside move (e.g RLT; FL).
To implement step 1 you need moves that change the orientation of FACING LINES. Surprisingly Bend-the-line from two-faced lines does NOT do this, but here are some things that DO
- Bend the line from lines (either facing in or out, but out typically has better flow) (e.g. PT; BTL)
- Wheel and Deal, (e.g PT; WHD; C SQ3; SRT)
- First Couple Left Next Right. (e.g. SRT; PTC; DPT; FLNR)
- Centers Split 2 around 1 to a line This call sashays, be careful (e.g. SRT; C S2L; Box Gnat; RLT)
- Cloverleaf (eg. SRT; PTC; DPT; CL; C SQ3; SL)
- Circle to a line (eg. SRT; CTAL)
- Other more subtle ways using Tag the Line, or split circ, Swing thru with BBGG waves.
If after step 1 the two FOCUS GIRLS are in the same line then you can move on to step 3. If not, do a SRT (star thru); CKP (Chicken Plucker) and another SRT which will fix it.
If after step 2 your FOCUS BOY is in the same line as the focus girls you are done. Otherwise you can use any couple-facing-to-couple-beside move (like RLT; FL (Right and left Thru, Flutterwheel)) to get the boy in the same line as the girls.
Finally you can do a pass thru or a Square Thru 3, to get your focus line pointed out the right direction and call move on.
Modules for rotating a line
Generally speaking in traveling squares, you are doing one of two things
- Making you pilot line continue move toward the wall it is currently facing OR
- Rotating your pilot line so it points at the ‘other’ wall (e.g. SIDE wall if it was facing HEADS).
While you can do (2) from first principles following the technique above, it is useful to have memorized some modules that simply do this. It turns out such modules always consist of three components.
- A call that changes walls, as discussed previously (e.g. WHD, CL, …)
- A ‘circulate’ call that causes people from one half of the square to move to the other half (e.g. circulate, trade by, or a pass through from a double pass thru formation).
- A Couple-beside-to-couple-facing call (e.g RFL).
Here are some examples of modules that do this. Note that any time there is a trailing Reverse Flutterwheel (RFL) you can substitute a Pass the Ocean, Girls Trade, Recycle, Sweep a Quarter (or a RLT; FL). You can also substitute a SRT; RFL with a Touch a Quarter, Walk and Dodge, Partner Trade (TQ; WAD; PTD). Thus the first three examples below are really just variations on a theme. You could easily create variations for the others.
PT; WHD; C PT; RLT; VL; BTL;                keeps partners
PT; WHD; C PT; SL; RFL;                     keeps partners
PT; WHD; C PT; SL; PTO; GT; REC; SAQ;        keeps partners
PT; WHD; C PT; TQ; WAD; PTD;                keeps partners

PT; BTL; PTO; CIRC; GT; REC; SAQ;            swap partners
PTO; ST; BR; FW; DPT; CL; C PT; SL; RFL;    swap partners
SL; C S2L; SRT; TB; SL; RFL;                swap partners
PTO; ST; BR; FW; DPT; FLNR; RLT; FL;        keeps partners
PTO; SPLIT CIRC; ST; BR; RFL;               keeps partners
If you want to simply keep going in the same direction, you will want to have a short ZERO between the move on calls. Here are some good zeros.
PTO; REC; SAQ;
PTO; ST; BR; CDTL;
PT; WHD; DPT; FLNR;
PTO; GT; REC; SRT;
SRT; PTC; C SQ3; SRT;
SRT; PT; TB; (ANY CKP SEQ) SRT
However it is also nice to do something that is NOT a zero but keeps your focus line together. This way it is not so obvious that you always transition the same group of 4. Here are some modules that are NOT zeros but keep the focus line together (swapping partners)
PT; WHD; DPT; CL; C PT; SL;           swaps partners
PTO; CIRC; REC; VL; CIRC; CDTL;       swaps partners
PTO; CIRC; GT; ST; BR; CIRC; CDTL;    swaps partners
PTO; CIRC; REC; PT; TB; SL;            swaps partners
PT; BTL; RLT; FL; PT; BTL; RLT         swaps partners
So one way of doing progressive squares is to memorize these modules. This is definitely a good technique, but like patter calling in general, it is good to know how to ‘resolve’ in case you call one of your modules incorrectly. If you remember your focus couple and their corner, and you stay in odd station, and you understand the resolution technique given above (that is how to get your people in a line), then, even if you ‘mess up’ you can recover and complete your tip.
Congratulations! You now know how to do progressive squares.
Coolness with a Rectangular Set of Squares
Finally I should mention that there is a nice property that happens if you have a perfect rectangle of squares. Let’s assume we have 3 squares left to right and 4 squares top to bottom. If you have your focus line in the bottom right corner go three squares to the left it turns out that the ‘other half’ of the square first ‘bounced off the right wall’’, and then ‘chases’ the focus line down the row. On the 3rd move to the left , the focus couple ‘bounces off the left wall’ and the other line ‘catches up’, reforming the original square (but now in the lower left corner). At this point you could ask the dancers to promenade home (now in a different location).
Similarly if you have your focus group move 4 squares up all the squares will reform at the ‘mirror image’ position. Thus you don’t have to ‘go out and come back’ and reform where you started, you can ‘go out’ and end your tip after everyone has moved to their mirror image position (which is probably even cooler than getting back to the square’s original position on the floor).
Note that you DON’T need to go ‘all in one direction’ and then ‘all in the other’. You can keep zig-zagging across the rectangle as long as your focus couple ‘bounces off’ exactly once off the left-right wall and once off the top-bottom wall.
Jagged Sets of Squares
If you don’t have a perfect rectangle of squares (e.g. 5 squares in a row of 3 and a row of 2), the technique in the section above will NOT work because dancers in different rows/columns bounce off the walls at different times leading to chaos. However the ‘retrace your steps’ technique (described first), will ALWAYS WORK, even in the jagged case. This is not as impressive as reforming the square somewhere else, but it is still pretty cool.
Working with 3 squares
The most likely jagged setup that you will work with is 3 squares. Now you might think that with three squares in a jagged formation that you could do just a ‘PASS THRU; MOVE ON; operation twice in the same direction and that would be a no-op (all your original square is back together again). The rationale is that this sequence would work with JUST a row of two squares, and dancers in the ‘lone square’ never leave their square and thus should be fine. I thought that at one time, and I WAS WRONG. The reason is that when you ‘bounce off a wall’ (which is what one line is doing whenever you do a PASS THRU; MOVE ON) , you SWAP ORDER. Thus after doing two PASS THRU; MOVE ON operations it is true that all squares have their original people in them, but the row that has two squares your focus line bounced off the wall exactly once, whereas the row that had only one square the line bounced off of two walls. This means some squares have done the equivalent of a right and left thru, while other squares have not. Thus if you try to resolve and promenade home some square on the floor will be wrong.
The straightforward way to fix this is to simply fix the lonely square. After doing Pass thru move on, twice and while your focus line is still in a line, simply ask the square that never interacted with another square to do a right and left thru. That will put all the squares in the same place (you can resolve). Then I would suggest that you make your focus line go in the other dimension so that every square gets to interact with other squares.
You can of course do this with other odd numbers (like 5), but in the case of 5, you will not be able to go in the other dimension because there is not a singleton square in that direction. Thus the odd square will never get to participate (sad). To get everyone participating you will need to go out and retrace your steps (which is OK).
Singing Call Progressive Squares
Unfortunately the technique above where you ‘move on’ to an adjacent square does not work in a straightforward way with a singing call. There are two reasons for this.
- As we noted before, when you exchange a line of dancers with an adjacent square you MUST exchange a Number 1 man (that is the head man with his back to the caller) with a number 3 man (the head man facing the caller). Because of this you end up with a square where two men think they belong in the number 1 position, and the square will crash on a promenade.
- Unlike patter, in a singing call, the ladies are rotating around the square and that adds another layer of complexity to get everyone back together if you are progressing between squares on every figure.
There are a number of ways to try to get around these issues, but I happen to like the one I am about to explain. It is inspired by a ‘scatter promenade’ which a group of friends can do at festivals. The idea is that when a PROMENADE happens, everyone leaves their square (as couples) and promenades to a new position in another square, and you continue dancing. Typically only a small handful of squares do this and they go to nearby squares. There is certainly a lot of chaos in the transition (it often takes time for everyone to find a new square) and you certainly don’t end up with your original partner, but the chaos can be fun if everyone has a free-spirited outlook.
The interesting question is: can we do something LIKE a scatter promenade, that avoids the chaos and allows people to end up with their partner at the end of the singing call? Surprisingly, the answer is YES and this is the technique I will describe here.
First to use the technique, the squares need an ORDER, that is each square needs to know what the ‘NEXT’ square is. For most venues, this is easy, you just think of the squares on the floor as forming a ‘ring’ and the next square is always the square in the counter clockwise (promenade direction). This works well, for numbers of 8 squares or less, but for 9 squares (a 3 x 3 grid) there is a problem with the very center square. You can fix this either by avoiding the center square (push it into the outer ring), or simply have multiple rings (you can have a ring of size 1 in your 3x3 grid, it just means that the very center square will not progress (it progresses to itself)). The rings can nest if you like, or they can be adjacent rows of a grid (if you have an even number of rows). All that matters is that every square is reasonably close to its NEXT square (rings do this naturally), and that everyone knows which square is their next square.
You also need to teach a new move called ‘PROMENADE HEADS (or SIDES) PROGRESS’. When you call this it means that as the promenade happens the heads (and only the heads) promenade to the NEXT square on the opposite side (thus the #1 couple becomes the #3 couple and vice versa). Another way of thinking about this is that the heads promenade ½ way but to the NEXT square. The reason for only promenading to the opposite side is that it is SHORTER (since they also have to get to the other square), and you will find it VERY NATURAL to SLOT IN behind the SIDES who are promenading normally. It is a happy fact that this works so well. You can see the scatter promenade inspiration in this move, but because we only ask HALF the square to leave, the half that stays acts as a ‘scaffold’ to reconstruct the square. We are also giving the couples that do progress (scatter) a definite destination and this destination is CLOSE so it will not take much longer than a normal promenade. This eliminates the chaos.
You will want to practice this a few times in patter so that people get the hang of it. You also must warn them
- Progressing gives the boys a NEW HOME (across the square) Thus they have to remember to come back to this home until the next time they are asked to progress. Trying to go back to their original home is the most likely thing to make the squares crash, but luckily the fact that SIDE couples get in their way if they try to go to the wrong home will usually ensure that they can recover from it reasonably quickly.
- When you first practice it in patter, have them promenade their partner (that is do an allemande left your corner and then promenade your partner home HEADS PROGRESS).
- During the actual singing call the LADIES WILL PROGRESS AS NORMAL (that is you SWING your corner and promenade this new corner home. However when you call HEADS PROGRESS you are referring to the BOYS (since the side lady progressed to the head position). In short, ladies promenade home with whoever they swung as is normal for a singing call.
Once you have taught the dancers HEADS (SIDES) progress, the technique is pretty simple you do a singing call as normal (opener, two figures, middle break, two figures and a closer), but during the first two figures you ask the HEADS to progress on the promenade and on the last two figures you ask the SIDES to progress. If you do this everyone ends up with everyone they started with but the whole square moved two positions on the dance floor around the ring. They will have also danced with dancers from 2 other squares besides their original square.
As always, if the square breaks down, ask the dancers to form a static square with SOMEONE waiting for the next figure. Note that you may end up with too many dancers for one square (basically someone forgot to progress). The ‘extra’ couple needs to get the square that is missing someone (which SHOULD be nearby). Stress to the dancers that you HAVE TO PROGRESS if the caller tells you to.
Tips for Singing Call Progression
- YOU MUST progress HEADS twice FIRST and then the SIDES twice. DO NOT alternate them in a singing call because it interferes with the ladies progression and dancers will not end up with their partner in the end.
- At least initially use a singing call with a CIRCLE LEFT figure for the middle break and closer (that is no grand squares, or stars). This is because CIRCLE LEFT figures are VERY ROBUST if you start them late, so if there is some chaos during the progression, you can wait for the slow dancers and recover. Remember the whole floor succeeds or fails together.
- Use SHORTER figures (e.g. 33 beats, NOT the usual 36-38 beats) because this gives the dancers some extra time to do the progression (or recover from a mistake). I would use the same figure each time, because they have enough to worry about.
Six Couple (Rectangular) Squares
There will inevitably come a time when the turnout for a dance is not great, and you have 6 couples but not 8 people to dance. In the worst case you have 15 people and thus 7 people have to sit out. This is when it is useful to create 6 couple squares (rectangles).
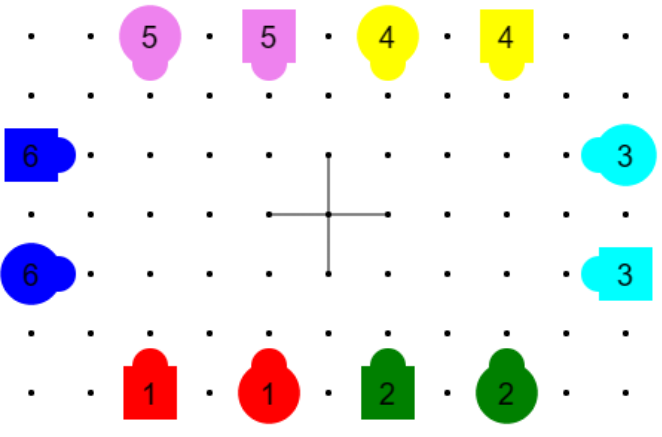
I used to think that calling for 6 couple squares would be ‘hard’ because you would have to remember the home position of 3 couples, and would require remembering more. It turns out it is NOT significantly harder to call for 6 couple squares IF YOU FOLLOW SOME RULES that allow you to LEVERAGE your 4 couple square knowledge. You can EVEN do singing calls THAT do full lady’s progression if you want. Because it is EASY, it is nice to have this in your ‘toolkit’ if you even have dances with 12-15 people. It is ALSO useful as a WORKSHOP novelty because you can teach dancers slightly strange moves (like bend the line or wheel and deal from lines of 6), which are novel and fun.
What is Different in 6 Couple Squares
Obviously the main difference between 6 couple and 4 couple squares is that you have more heads than there are sides. However because 80% of all calls are 2 COUPLE moves (they only need 4 people to do the move), ‘most’ moves ‘just work’. However when you have lines of 6 (instead of 4) like this
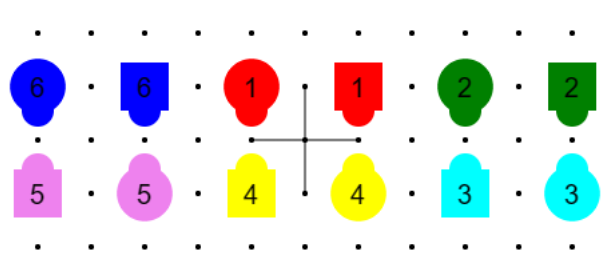
After h lr; vl; btl;
AND you are doing moves that are not ‘two couple’, then you run into issues. The most important moves that are problematic are:
- Bend the Line from lines of 6 (not two faced).
- Wheel and deal from lines of 6 (that is lines facing out).
There are a few others, but they are rarer (Split 2 around 1, Separate around 1 …) Note that both Bend the Line and Wheel and deal CAN be done from TWO FACED LINES OF 4 (which you can form).
You will also find that double pass through formation in rectangles is weird. Moves that you would expect to form a double pass through formation like Dive Thru, Pass to the Center, or Ferris Wheel end in this formation
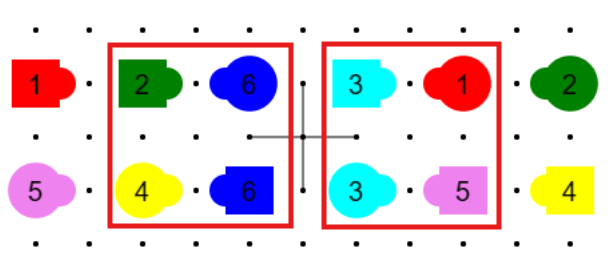
Notice that the very centers (couples 6 and 3) are pointed in a way that is opposite of the way you were probably expecting. You would NOT want to call a double pass thru (dancers would be confused). Note that while you can’t call double pass through from this formation you CAN call Centers Pass Thru or Centers Square Thru 3 from this formation and it works (you may have to get the dancers familiar with the concept that there are TWO groups of centers (highlighted in red boxes above), but dancers take to it quickly. I will call this formation the ‘centers active’ formation because it sets up the centers to do things without the ends (and calling it double pass thru would be at best misleading).
Because we can’t call double pass thru, getting to a completed double pass through configuration is also problematic, which means moves that rely on that formation like
- Cloverleaf
- Centers In
- First Couple Left next Couple Right
Do not work without modification.
So there are a bunch of calls that ‘don’t work’. The other main point is that
- Heads can do things that the sides cannot.
In particular your first calls to get you ‘to the grid’ will be to the heads. Square Thru *, and Lead Right both work, but only for the heads. There are a few things the sides can do, but it is questionable whether they are worth calling.
What is The Same in 6 Couple Squares
What is amazing, however, is that SO MUCH just works in 6 couple squares. In particular, as a general rule, if you have a ZERO MODULE for a 4 Couple square and it is LEGAL in a 6 couple rectangle, it is very likely a ZERO MODULE in a 6 couple rectangle. In particular MOST singing call figures in Square Dance Figures work (unless they hit bad formations). This is absolutely FABULOUS because it means that you don’t have to LEARN new singing call figures to call 6 couple squares.
Note that, sadly, Heads (Sides) Promenade ½ is a problematic call and it is used commonly in singing call figures. The good news is that you can substitute Heads Right and Left Thru, for the heads promenade ½ and the figure will probably work.
To prove sequences work for 6 couple squares, I have made a ‘Taminations Sequencer’ like program that works for 6 couple squares
It works very much like the taminations sequencer (but it is not animated, it just shows the final formation). Try out the figures and modules you know and see which ones work.
The fact that so much of what was DESIGNED for 4 couple squares just works on 6 couple squares is nothing short of amazing. It means that you can IMMEDIATELY try 6 couple squares in your patter simply by using the singing call figures you already know.
Resolving in 6 Couple Squares
But wait, it gets better. Not only do most of your singing call figures work, your RESOLUTION techniques work! This blew my mind. It turns out that the restrictions on what you can call (because they lead to problematic formations) have an important side effect: they keep the boys and girls in circular order. Consider the following formation after a bunch of calls were made.
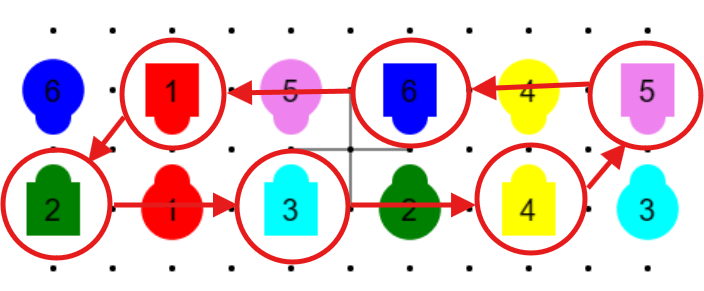
It looks pretty messed up at first, but if you look at JUST the boys, you will notice that as you go around the formation they are in order. Notice it is also true for the girls. Now sometimes the order is clockwise and sometimes it is counter-clockwise, but it is ALWAYS the case that the number 3 boy is between the number 2 and number 4 boy. TRY IT ON THE SIMULATOR! You can’t break this invariant (without using illegal/modified calls).
This has a REALLY important property:
Normal 4 Couple Resolution Will work
In particular to resolve
- Get to odd station (you remember this, just like in 4 couple)
- Get to 2 faced lines (you will have three of them for 6 couple)
-
Get your focus couple in the same line (our focus couple is the red couple) by using either girls trade or couple circulate (or both). For 6 couple the worst case is the following
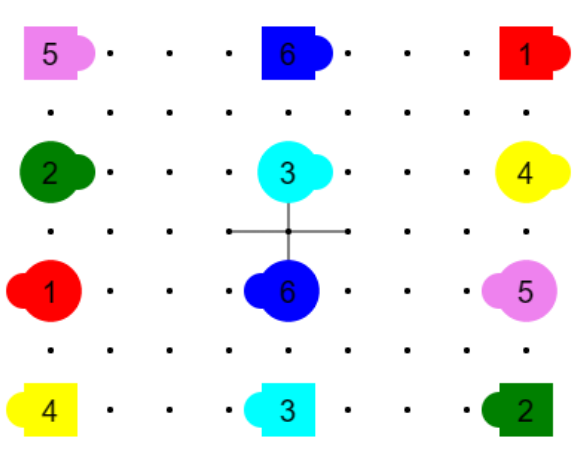
Worst case to get red couple in same line
This is the worst case because the red couple is ‘far apart’ and ‘pointed apart’. Notice however that two couples circulates will cause the red couple to meet in the middle line. Note that in the technique that uses girls-trades and couples-circulates will work for 6 couple but it might be tedious. The basic idea is that you get the girl to the END line (using couples Circulates) and keep her facing OUT (using girls-trade) so that when you couple circulate she stays in that line as the boy gets closer. In the case above, three couple’s circulates will do it. That is pretty tedious, so you probably just put some random zeros in there to hide what you are doing.
4. Get your focus couple to the end line (not the middle line) We did not need to do this in 4 couple squares because every line was an end line. Since your focus couple is in the SAME 2-faced lines already, either they are a couple, or you can make them a couple by doing a girls-trade. The couples circulate will get them out of the middle line.
5. Get your focus couple to the ends as a couple facing in. This works as in 4 couple squares.
6. Do CKP (Chicken Plucker) as needed to get your focus boy facing his corner (who you remembered). This is where the magic of keeping people in order comes into play. Because people are kept in order, the only people ‘nearby’ our red #1 boy are his corner (the blue #6 girl) and his ‘right hand lady’ (the #2 girl, who happens to be a head). Thus if you are not already resolved, a CKP will swap the corner and right hand lady and resolve the square.
The key point is that RESOLUTION basically works unchanged. I encourage you to ‘mess up a square’ remembering only a focus couple and a corner for that couple and resolve it. It should just work.
Singing Calls in 6 Couple Squares
Two notable things are pretty obvious
- Right and left Grands, and weave the rings need 7 hands instead of the normal 5 hands to get back to your original partner. You need to tell the dancers that (OR see below for an alternative)
- Promenades (or anything else that ‘goes around’ the full circle) take longer in a 6 couple square. This means that grid figures in singing calls need to be shorter so that there is more time for the promenade.
While the fact that promenades take longer seems obvious there is an exception to this rule.
- The standard opener (Circle left, Allemande Left, Dosado, Allemande Left, Weave the Ring, Promenade home), DOES NOT TAKE LONGER (if you are careful and let the dancers circle left at least ½ way (in normal singing calls you circle one full cycle, so it is not hard to circle left at least ½ way)).
This surprised me when I learned this, but the reason for this is the same reason why this sequence is ‘MAGIC’ and can take longer or shorter depending on how long you call ‘circle left’ The reason is that the sequence is not really a LOOP. The dancers go left, do stuff, and then come back. Notice that the distance they go DOES NOT DEPEND ON THE NUMBER of dancers but rather HOW LONG YOU CIRCLE LEFT. Thus it is the same for 6 couple squares as it is for 4 couple Squares (this is very nice). The key to making this work however, is that the ‘circle left’ has to be long enough so that the ‘weave the ring’ does not ‘overshoot’ home (which forces the dancers to promenade once around, which will take very long). Normal singing calls naturally ‘circle left’ long enough.
Weave the Rings
As mentioned, to make a right and left grand, or a weave the ring a ‘no-op’ (that is you come back to the person you started with) in a 6 couple square, you need to advance 7 hands instead of the regular 5 hands. Definitely have the dancers count the number of hands so they don’t forget. There is an alternative, however, which is to do some other call that moves the ladies TWICE in the weave direction (that is ladies to the left men to the right as you face in). This is most often done by doing a ROLLAWAY TWICE). You can also have the ladies chain 2 people. Once you do this, you can then tell them to only go the standard 5 hands.
Ladies Progression
So the good news is that we use the standard opener, it will not take any more time (great). However normal figures will have us ‘swing and promenade’ and those promenades WILL TAKE LONGER. So this means we should pick SHORT figures to give dancers more time for the promenade. Since Square Dance Figures comes with a set of ‘short’ figures, and we memorized one or two in case dancers fell behind, we will just use one of those. Choose figures that are around 30 beats.
But we still have a problem. Ladies have to progress 6 times, but we only have 4 figures. The easiest way to solve this is to have the MIDDLE BREAK and CLOSER advance the ladies. It turns out that this is pretty easy. If you simply add a SINGLE ‘ladies center men sashay’ to your circle left, in that figure, then whoever was your corner before becomes your partner (that is the ladies advanced). This assumes that you are doing a 7 hand right and left grand. Note that if you do a single ROLLAWAY and a 5 handed right and left grand (or weave), it will also advance the ladies one position, so either option is possible.
So the rules for 6 couple singing calls are
- Use the standard ‘circle left’ figure with a 7 hand weave. This is a no-op
- Use short (30 beat) figures
- Add a ladies center men sashay to the middle break and closer (note that the weave the ring is 7 hands). This advances the ladies for these two figures.
That is it! Alternatively you could
- Use a circle figure with TWO ROLLAWAYS with a 5 hand weave. This is a no-op.
- Use short (30 beat) figures
- For the middle break and closer, use a circle figure with a ONE ROLLAWAY and a 5 handed weave the ring. This advances the ladies for these two figures.
You can now do 6 couple singing calls!
Grand Square
For your first 6 couple singing calls, I would stick with the ‘circle left’ opener. However it turns out it IS possible to do a grand square with 6 couples. It comes with TWO caveats.
-
YOU WILL HAVE TO WALK THROUGH A TEACH WITH THE DANCERS. The key to doing a grand square is that VERY CENTER people (e.g. #1 girl and the #2 boy)
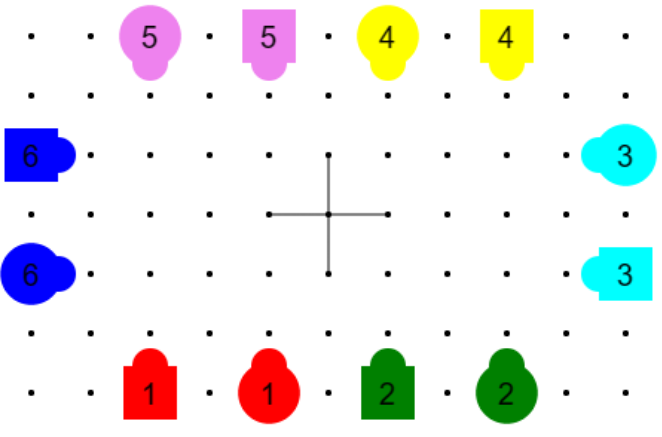
are NOT doing what they would normally do on a grand square. They are used to facing their PARTNER after taking the first three steps, but now they face EACH OTHER. When I teach Grand Square I mention that you will ONLY face your PARTNER OR your OPPOSITE, and you will alternate. For these very center people, they will face their OPPOSITE or EACH OTHER (not their partner). If they do this everything works.
Note that it does not hurt to tell the sides that half the time they have to take bigger steps so they get past both head people, but generally they figure this out without instructions.
-
The grand square does take the same amount of time as with a 4 couple square, HOWEVER typically afterward you call an ‘Allemande Left; Weave; Promenade’ which WILL take longer (because of the promenade). You should substitute a SHORT Circle Left, Allemande Left; Promenade instead. (by SHORT what I mean is that you only circle left slightly over ½ way. We skip the weave the ring because if you are not careful you will end the circle left too soon, and the weave the ring will ‘overshoot’ home. By promenading you avoid that possibility).
I would only do a grand square with 6 couples if the dancers were above average AND I was feeling adventurous. When in doubt, skip it.
Three Couple Moves
The reason that things ‘just work’ in 6 couple squares is that whenever you do a move that requires more than 4 dancers, you do it along the axis that has only 4 dancers in it. This is what keeps everyone in order. It is possible, however, to do such moves along the 6 dancer axis. For example you can bend the line when lines of 6 are facing, however now you have to break the lines BETWEEN the center two dancers to form lines of six on a new axis. You can also modify wheel and deal, so that it forms a triple pass thru formation. You can also add a new call ‘stretch ferris wheel’ which also forms a triple pass thru formation. Once you have a triple pass thru formation, other moves like cloverleaf, cast off ¾ and first couple go left, next couple go right work. If you are interested in these moves just try them out on the Six Couple Simulator to see how they work.
However, I should note that there are definite disadvantages to trying to use these moves.
- These moves will break the sequential order in the square, which means that 4 couple resolution techniques will NOT work. There are resolution techniques that DO work, but they require that you remember the ordering of 3 couples (not just 2), which is a NON-TRIVIAL thing to learn to remember, and the resolution technique is more complex.
- The other problem of course is that you have to teach the dancers these new moves. If the goal was to do something new/exciting, this is a PLUS (so you can do it for a workshop), but if the goal is just to allow 6 dancers to dance, then it is not worth it.
You can mitigate the resolution problem by doing something very similar to what we did to make corner box patter calling more interesting. Remember in that technique we got to a corner box (that is H SQ4), and then STAYED THERE. We made this more interesting by allowing ourselves to leave (e.g. calling a CKP), but immediately got back (by calling another CKP). In this case we can call these 6 dancer axis moves (which could break resolution), but immediately come back to a safe formation (when all the dancers are in order around the rectangle). Here are some sequences that do this.
- pt; btl; (Any 2 Couple Zero from lines) pt; btl;
- pt; whd; zoom; triple pass thru (tpt); first left next right (flnr);
- stretch ferris wheel (sfw); zoom; zoom; tpt; flnr;
Note that these are not zeros, they are moves that keep the boys (and girls) in order around the rectangle. You will need to (4 couple) resolve the square from there. If you want to pursue this then experimenting with the Six Couple Simulator is definitely called for.